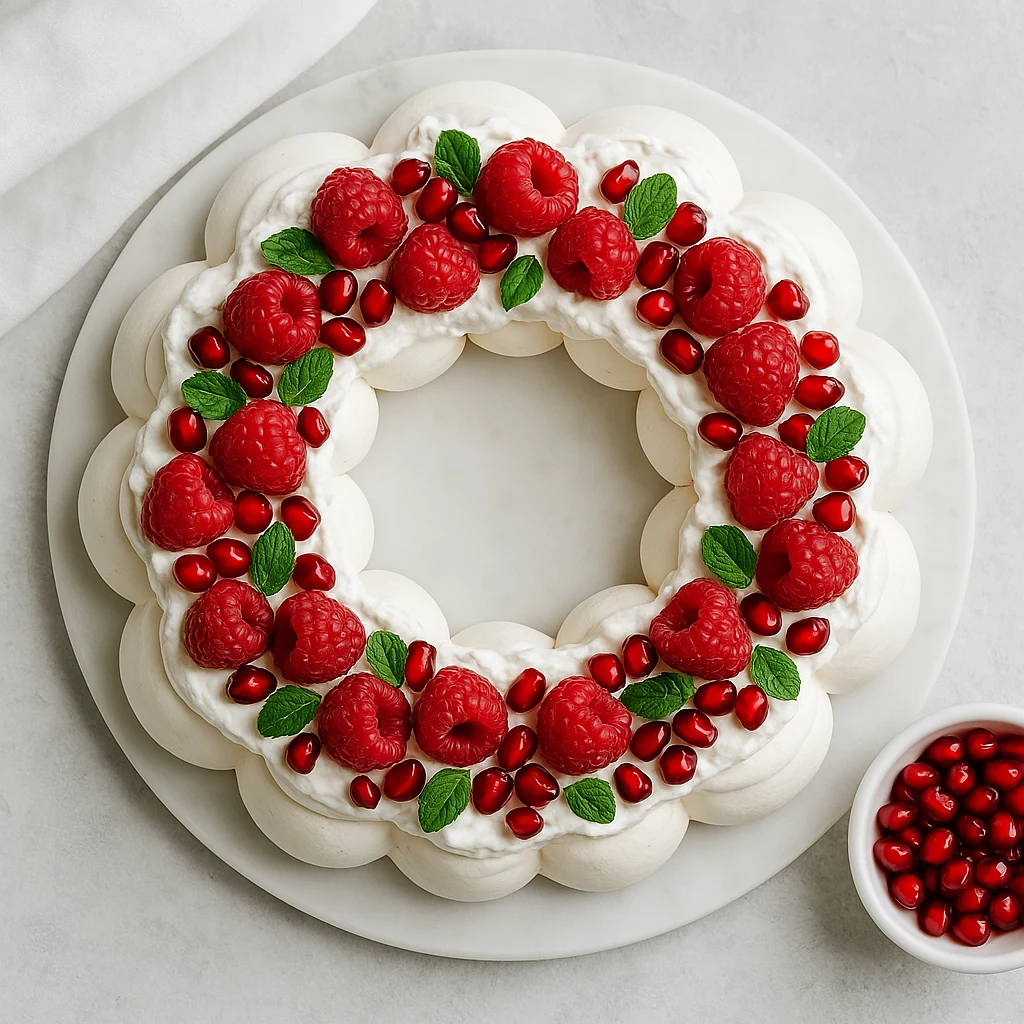
Pavlova Wreath Recipe
Pavlova Wreath is one of those desserts that goes beyond satisfying a sweet tooth — it creates moments of pure magic at your table. This ethereal creation features a crisp meringue shell that shatters delicately under your fork, revealing a marshmallowy center that melts in your mouth. Crowned with billows of silky cream and jewel-toned fruits, it’s a symphony of textures and flavors that transforms any gathering into a celebration.
What makes this Pavlova Wreath recipe so special isn’t just its exquisite taste—it’s the breathtaking presentation. Shaped into an elegant ring and adorned with nature’s most beautiful fruits, it commands attention as the centerpiece of your table. And here’s a delightful secret: while this dessert looks like it requires a pastry chef’s expertise, I’m going to guide you through creating this masterpiece in your own kitchen with straightforward, foolproof techniques.
As an added bonus, this showstopper is naturally gluten-free, making it perfect for gatherings where dietary restrictions might be a concern. The lightness of the meringue also makes it an ideal finale to a substantial meal, offering sweetness without heaviness.
Pavlova Wreath Recipe Review
Baking Time and Nutrition Facts
10 People
30 Minutes
75 Minutes
275 Kcal
15 Minutes
4 Hours
32g
14g
3g
Why You’ll Fall in Love with This Pavlova Wreath
- Absolute Showstopper: Guaranteed to elicit gasps of admiration when you bring it to the table
- Magical Texture Contrast: Experience the perfect harmony of crisp exterior, marshmallowy center, silky cream, and fresh fruit in every heavenly bite
- Naturally Gluten-Free: A spectacular dessert everyone at your table can enjoy without compromise
- Surprisingly Light: Feels ethereal compared to traditional cakes, making it perfect after a hearty meal
- Endlessly Customizable: Adapt the toppings to showcase whatever fruits are at their seasonal peak
- Make-Ahead Friendly: Prepare the meringue base in advance to minimize day-of stress
The Art of the Perfect Pavlova Wreath
Creating a Pavlova is both an art and a science. The delicate balance of sugar and egg whites creates a dessert that’s simultaneously crisp and tender—a culinary contradiction that makes it so uniquely satisfying. While Australian and New Zealand cuisines both claim this dessert as their own (a friendly debate that continues to this day), I think we can all agree that whoever invented it deserves our eternal gratitude.
The wreath shape not only elevates the presentation but also creates the perfect vessel for holding generous amounts of cream and fruit. The slight hollow that naturally forms in the center during baking seems designed by nature specifically for this purpose!
Pavlova Wreath Recipe Ingredients
Key Ingredients
- For the Meringue Wreath:
6 large egg whites (180g), at room temperature (aged overnight in the refrigerator if possible)
1½ cups (300g) caster sugar (superfine sugar)
2 teaspoons cornstarch (cornflour)
1 teaspoon white vinegar or lemon juice
1 teaspoon pure vanilla extract
Pinch of salt
- For the Cream Topping:
2 cups (480ml) heavy whipping cream, very cold
3 tablespoons (24g) powdered sugar (confectioners’ sugar)
1 teaspoon pure vanilla extract or ½ teaspoon vanilla bean paste
- For the Fruit & Decoration:
- Spring/Summer Options:
2 cups mixed berries (strawberries, raspberries, blueberries, blackberries)
4-5 passion fruits, pulp scooped out
2 kiwi fruits, peeled and sliced
Fresh mint leaves
Edible flowers
- Fall/Winter Options:
Seeds from 1 pomegranate
3-4 figs, quartered
2 mandarin oranges, segmented
Thin shavings of dark chocolate
Toasted pistachios or hazelnuts
Fresh thyme or rosemary sprigs (for Christmas)
Equipment You’ll Need
- Piping bag with large star
- Large mixing bowl
- Measuring cups and spoons
- Whisk
- Silicone spatula
- Parchment paper or silicone baking mats
- Round Cake Pan
- Wire cooling rack
How To Make Pavlova Wreath
Instructions
- Preparation
1- Preheat your oven to 275°F (135°C). Position rack in the middle of the oven.
2- Place a sheet of parchment paper on your baking tray. Using an 8-9 inch plate as a guide, trace a circle on the parchment. Turn the paper over so the pencil mark won’t touch your meringue.
3- Ensure your mixing bowl is absolutely clean and free from any grease. I recommend wiping it down with a paper towel dipped in white vinegar, then drying thoroughly. - Creating the Meringue Base
1- In your stand mixer fitted with the whisk attachment, begin whisking the egg whites and pinch of salt on medium speed until foamy and soft peaks begin to form.
2- With the mixer still running, start adding the caster sugar one tablespoon at a time, allowing 20-30 seconds between additions.
3- This gradual process is crucial for sugar dissolution and stable meringue.
4- Once all the sugar is incorporated, increase the speed to medium-high and continue whisking until the meringue forms very stiff, glossy peaks – about 5-7 minutes. The meringue should feel smooth between your fingers when rubbed, with no gritty sugar particles.
5- Gently fold in the cornstarch, vinegar, and vanilla extract using a spatula until just combined. These ingredients create that magical marshmallowy center. - Shaping the Wreath
1- Carefully spoon the meringue onto the parchment paper, following your traced circle guide.
2- Use the back of a spoon to create a shallow trench in the middle of the wreath, building up the sides slightly higher.
3- For a more refined presentation, transfer some meringue to a piping bag fitted with a large star tip and pipe decorative peaks around the top edge of the wreath.
4- Use the back of a spoon to create gentle swirls and peaks throughout the meringue – these will toast beautifully and add texture. - Baking and Cooling (The Critical Phase)
1- Place the meringue in the preheated oven and immediately reduce the temperature to 250°F (120°C).
2- Bake for 1 hour to 1 hour and 15 minutes. The exterior should be crisp and pale in color – avoid letting it brown.
3- When the baking time is complete, turn off the oven and prop the door open slightly with a wooden spoon.
4- Allow the Pavlova to cool completely inside the oven (at least 2 hours, preferably overnight). This slow cooling is essential to prevent cracking. - Assembly (Within 1-2 Hours of Serving)
1- When ready to serve, carefully transfer the cooled meringue wreath to a serving platter.
2- In a chilled bowl, whip the cold heavy cream with powdered sugar and vanilla until soft to medium peaks form. Be careful not to over-whip.
3- Spoon or pipe the whipped cream onto the cooled meringue wreath.
4- Arrange your chosen fruits decoratively on top of the cream.
5- For maximum visual impact, vary colors, heights, and textures.
6- Add final touches like mint leaves, edible flowers, or chocolate shavings.
7- For a touch of luxury, dust lightly with powdered sugar just before bringing to the table.
Chef Patissier’s Secrets to Pavlova Perfection
Achieving That Perfect Texture
The hallmark of an exceptional Pavlova is the contrast between the crisp exterior and marshmallowy interior. To achieve this balance:
- Never rush the baking or cooling process
- Ensure the oven temperature is precisely followed
- Add cornstarch and acid (vinegar or lemon juice) to your meringue
- Allow the Pavlova to cool in the gradually cooling oven
Preventing a Weeping Meringue
Those unappealing sugary droplets that sometimes form on meringues are usually caused by:
- Undissolved sugar: Make sure to add it gradually and whip thoroughly
- High humidity: Choose a dry day for baking if possible
- Exposure to moisture: Store unfilled meringue in an airtight container
Avoiding Cracks and Collapses
While a few small cracks are part of Pavlova’s rustic charm, major fissures can be prevented by:
- Never opening the oven door during baking
- Cooling slowly in the turned-off oven
- Not exposing the hot meringue to cold air
- Using room temperature egg whites
Getting Maximum Volume
For that impressive cloud-like height:
- Use fresh, room temperature egg whites (aged overnight in the refrigerator if possible)
- Ensure your bowl is completely free from any fat residue
- Add a pinch of salt when beginning to whip
- Use superfine sugar for better dissolution
Battling Humidity
Humidity is the enemy of meringue. If you live in a humid climate:
- Run your air conditioner or dehumidifier before baking
- Double-check that your meringue reaches stiff peaks before baking
- Consider adding an extra teaspoon of cornstarch
- Plan to serve soon after assembly
Pavlova Wreath Decoration Inspirations
Part of what makes a Pavlova Wreath so magnificent is how it showcases the best fruits of each season. Let these suggestions inspire your own creative combinations:
Winter Wonderland (December-February)
Create a festive holiday masterpiece with pomegranate jewels, ruby red cranberries (briefly poached in simple syrup), mandarin segments, and dark chocolate curls. Add sprigs of fresh rosemary or thyme lightly dusted with powdered sugar for a “snowy” effect. For Christmas, consider adding touches of gold leaf for ultimate luxury.
Spring Revival (March-May)
Celebrate the season of renewal with early strawberries, delicate edible flowers, and a gentle touch of lemon curd swirled through the cream. Pastel-colored macarons arranged around the wreath create an especially elegant Easter centerpiece.
Summer Abundance (June-August)
Embrace the height of berry season with an overflowing arrangement of strawberries, blueberries, raspberries, and blackberries. Add slices of peach or nectarine, passion fruit pulp, and plenty of fresh mint. The vibrant colors against the white canvas are breathtaking.
Autumn Elegance (September-November)
Showcase the transitional bounty with sliced figs, blackberries, plums, and perhaps thin slices of poached pear. Sprinkle with toasted hazelnuts or walnuts and a drizzle of honey. A touch of orange zest in the cream complements these deeper flavors beautifully.
How To Store Your Pavlova Wreath
Pavlova’s beauty comes with one challenge: timing. Here’s how to manage it:
The Meringue Base:
- Can be made 1-2 days ahead of serving
- Store in a completely dry, airtight container at cool room temperature
- Never refrigerate the unfilled meringue (humidity will soften it)
The Whipped Cream:
- Best prepared just before assembly
- For stability, consider adding 2 tablespoons of mascarpone or cream cheese to your cream before whipping
- Or use a gelatin stabilizer: bloom ½ teaspoon of powdered gelatin in 1 tablespoon cold water, microwave for 5 seconds until liquid, then whisk into cream halfway through whipping
Final Assembly:
- Must be done no more than 1-2 hours before serving
- Once cream touches meringue, the clock starts ticking as moisture will begin softening the shell
- Not suitable for freezing in any form
Ready To Bake ??
As you place your Pavlova Wreath at the center of your table, surrounded by loved ones, you’ll understand why this dessert has become legendary. The gasps of admiration and the silence that falls as everyone savors their first bite are the ultimate reward for your efforts.
Remember that Pavlova embraces a certain rustic elegance—small cracks or imperfections are part of its charm. What matters most is the joyful experience of creating something beautiful with your own hands and sharing it with those you care about.
I encourage you to make this Pavlova Wreath your own. Experiment with seasonal fruits, play with flavor combinations in the cream, or add your own decorative touches. Then, when you’ve created your masterpiece, I’d love to see it! Share your creation in the comments below or tag me on social media. Your Pavlova might just inspire another home baker to create their own moment of culinary magic.
FAQs About Pavlova Wreath Recipe
Can I use regular granulated sugar instead of caster sugar?
While caster sugar dissolves more readily due to its finer texture, you can pulse regular granulated sugar in a food processor for 30 seconds to create your own caster sugar. This extra step is worth it for a smoother meringue.
Is it possible to make mini Pavlova wreaths?
Absolutely! Trace 4-inch circles and divide your meringue accordingly. Reduce the baking time to about 40-45 minutes, but still cool slowly in the oven.
Help! My Pavlova cracked badly. What went wrong?
Sudden temperature changes are usually the culprit. But don’t despair! Even professional pastry chefs experience this occasionally. Strategically place your cream and fruit to cover major cracks, and it will still be delicious.
Why did my meringue weep or have beads of sugar on the surface?
This typically happens when sugar hasn’t fully dissolved into the egg whites. Next time, add the sugar even more gradually and rub a bit of meringue between your fingers to check for grittiness before baking.
Can I make a Pavlova in rainy weather?
Humidity presents challenges for meringue, but you can compensate by adding an extra teaspoon of cornstarch and being extra vigilant about achieving stiff peaks before baking. Running a dehumidifier or air conditioner in your kitchen can also help.
How do I know when my meringue is perfectly whipped?
The ultimate test: turn the bowl upside down over your head! If you’ve reached stiff peaks, the meringue won’t budge. Less dramatically, the meringue should stand in firm peaks when the whisk is lifted, and should feel smooth, not gritty, when rubbed between your fingers.