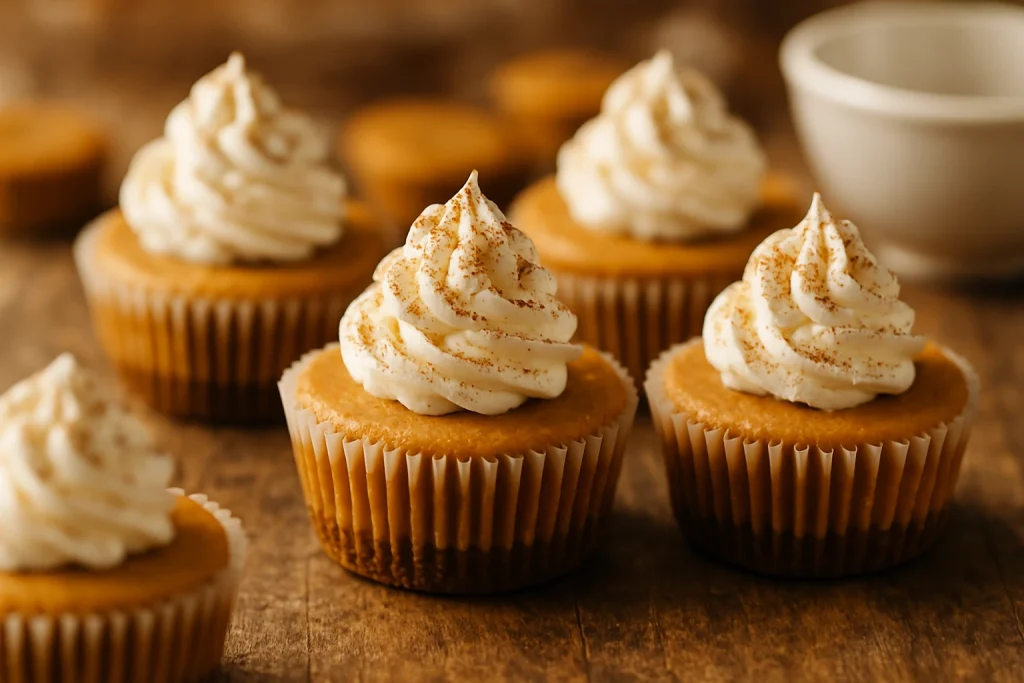
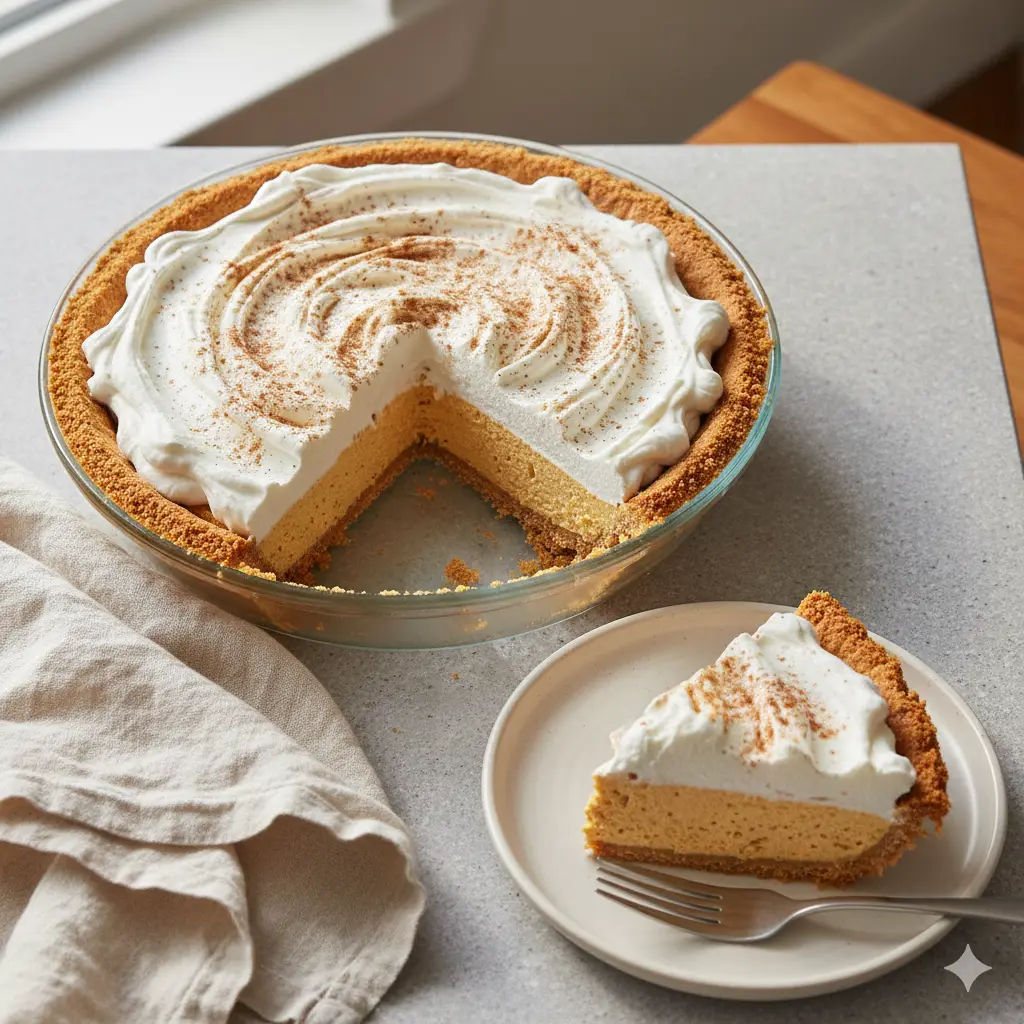
No-Bake Pumpkin Mousse Pie
This Easy Pumpkin Mousse Pie is about to become your new favorite fall dessert recipe. Imagine a cloud-like pumpkin mousse filling, perfectly spiced and impossibly smooth, nestled in a buttery graham cracker crust. It’s everything you love about traditional pumpkin pie, but with a sophisticated, lighter-than-air texture that will have your guests asking for seconds (and the recipe!).
Whether you’re planning your Thanksgiving dessert menu, hosting a fall gathering, or simply craving something seasonal and sweet, this no-bake pumpkin mousse pie is your answer. No oven mishaps, no stress, just pure pumpkin spice perfection. Best of all, you can make it ahead and let the refrigerator do all the work while you focus on everything else. Ready to create some magic? Let’s dive in!
Why You’ll Love This Pumpkin Mousse Pie
Let me count the ways this no bake pumpkin mousse pie recipe will steal your heart:
- No-Bake Perfection: Say goodbye to oven anxiety! This pie sets beautifully in the refrigerator, saving you precious oven space during the busy holiday season. No worrying about overbaking, cracking, or soggy bottoms.
- Light & Airy Texture: Traditional pumpkin pie is wonderful, but this mousse version is a revelation. The whipped cream creates an incredibly fluffy, cloud-like texture that feels indulgent yet refreshingly light. It’s the dessert you can actually enjoy after a big meal!
- Perfectly Spiced: All your favorite pumpkin pie spice flavors shine through—warm cinnamon, aromatic ginger, fragrant nutmeg, and a hint of cloves. Every bite tastes like fall wrapped in a hug.
- Easy to Make: With simple steps and everyday ingredients, this recipe is perfect for bakers of all skill levels. If you can whip cream and fold gently, you can master this easy pumpkin mousse pie recipe.
- Impressive Presentation: This pie looks like it came from a fancy bakery, but only you need to know how simple it was to make. It’s guaranteed to be the star of your Thanksgiving dessert table.
- Make-Ahead Friendly: Prepare this beauty a day or two before your gathering. Actually, the pie gets even better after sitting overnight, as the flavors meld and deepen. Talk about stress-free entertaining!
Pumpkin Mousse Pie Recipe Overview
Baking Time and Nutrition Facts
10 Slices
20 Minutes
4H20Min
320 kcl
4 Hours
Easy
24 g
17 g
Pumpkin Mousse Pie Ingredients
For the Graham Cracker Crust:
Key Ingredients
1½ cups graham cracker crumbs (about 10-12 full crackers, finely crushed)
3 tablespoons granulated sugar
6 tablespoons unsalted butter, melted
½ teaspoon ground cinnamon (optional, but highly recommended for extra warmth)
Chef’s Note: Don’t have time to make a crust? A store-bought graham cracker crust works perfectly here. Just make sure it’s a 9-inch size.
For the Pumpkin Mousse Filling:
Key Ingredients
1 cup pure pumpkin puree (canned is perfect—just make sure it says “100% pumpkin,” not “pumpkin pie filling”)
1 cup powdered sugar, sifted (sifting prevents lumps!)
1½ teaspoons pumpkin pie spice (or make your own blend: ¾ tsp cinnamon, ¼ tsp ginger, ¼ tsp nutmeg, pinch of cloves)
2 cups heavy cream, cold (this is crucial for proper whipping!)
1 teaspoon pure vanilla extract (optional, but adds lovely depth)
Pinch of fine sea salt (optional, enhances all the flavors)
Metric measurements: 240ml pumpkin puree, 120g powdered sugar, 480ml heavy cream
For Garnish (Optional but Delightful):
Key Ingredients
Freshly whipped cream
A dusting of pumpkin pie spice
Cinnamon sticks for decoration
Chocolate shavings or curls
Candied pecans
Why Quality Matters: Since this recipe has so few ingredients, each one shines through. Use good quality heavy cream (at least 36% fat content for best whipping), pure vanilla extract rather than imitation, and fresh spices if possible. Your taste buds will thank you!
How To Make Pumpkin Mousse Pie
Step 1: Make the Crust
In a medium bowl, combine the graham cracker crumbs, granulated sugar, and cinnamon (if using). Pour in the melted butter and stir with a fork until the mixture resembles wet sand and holds together when pressed.
Transfer the mixture to your 9-inch pie plate. Using your fingers, press the crumbs firmly and evenly across the bottom and up the sides of the pan.
Chef’s Tip: Here’s my secret for a perfectly even crust—use the bottom of a flat measuring cup or glass to press down firmly. This creates a smooth, compact crust that won’t crumble when you slice it. Pay extra attention to where the bottom meets the sides!
Place the crust in the refrigerator while you prepare the filling. This helps it firm up and makes assembly easier.
Step 2: Make the Pumpkin Mousse Filling
First, whip the cream: Pour the cold heavy cream into a large, chilled bowl. Using an electric mixer, beat on medium-high speed until soft peaks form. This means when you lift the beaters, the cream forms peaks that gently fold over at the tips. This usually takes 3-4 minutes. Be careful not to overbeat, or you’ll end up with butter!
Chef’s Tip: For the fluffiest whipped cream, place your mixing bowl and whisk attachment in the freezer for 10-15 minutes before starting. Cold is your friend here! Also, watch carefully as you approach soft peaks—it can go from perfect to overwhipped quickly.
Set the whipped cream aside for a moment.
Next, prepare the pumpkin mixture: In a separate medium bowl, whisk together the pumpkin puree, sifted powdered sugar, pumpkin pie spice, vanilla extract (if using), and salt (if using) until completely smooth and well combined. The mixture should be silky with no lumps.
Now for the magic—folding: Add about one-third of the whipped cream to the pumpkin mixture. Using a rubber spatula, gently fold it in using a motion that cuts down through the center, sweeps along the bottom, and comes back up the side. This lightens the pumpkin mixture and makes it easier to incorporate the rest of the cream.
Add the remaining whipped cream and continue folding gently until no white streaks remain and the mixture is uniformly light orange and fluffy.
Chef’s Tip: Patience is key here! Resist the urge to stir vigorously. Gentle folding maintains all those beautiful air bubbles you worked so hard to create. Think of it as tucking the cream into bed—soft and careful. The whole folding process should take about 30-45 seconds.
Step 3: Assemble the Pie
Remove the chilled crust from the refrigerator. Pour the pumpkin mousse filling into the crust, using your spatula to spread it evenly to the edges. The filling should dome slightly in the center—this is perfect!
Gently smooth the top with your spatula for a beautiful presentation. Don’t worry about making it absolutely perfect; once you add garnish, it’ll look stunning.
Step 4: Chill & Set
Cover the pie loosely with plastic wrap or aluminum foil, being careful not to let it touch the surface of the filling (you can insert toothpicks around the edge to create a “tent” if needed).
Refrigerate for at least 4 hours, though overnight is even better. The filling needs this time to set properly and for the flavors to meld beautifully.
Chef’s Tip: Resist the temptation to check on it constantly! Every time you open the refrigerator, you’re introducing temperature fluctuations. Just let it chill and work its magic.
Step 5: Garnish & Serve
Just before serving, remove the pie from the refrigerator. If you’re adding garnishes, now’s the time!
Pipe or dollop freshly whipped cream around the edges or create a pretty pattern on top. Dust with a light sprinkle of pumpkin pie spice for that professional bakery look. Add cinnamon sticks, chocolate shavings, or candied pecans for extra flair.
Slice with a sharp knife, wiping it clean between cuts for the prettiest slices. Watch as everyone’s eyes light up at that gorgeous, fluffy texture!
Pro Tips for Pumpkin Mousse Pie Success
Achieving the Perfect Texture:
- Cold ingredients are non-negotiable for whipped cream. If your kitchen is warm, place your mixing bowl in the freezer for 15 minutes before starting.
- Don’t skip sifting the powdered sugar—lumps in your mousse are not delightful!
- Stop beating the cream at soft peaks. Overwhipped cream will make your mousse grainy instead of silky.
The Art of Gentle Folding:
- Use a rubber spatula, not a whisk or spoon
- Fold in batches to make it easier
- Stop as soon as you don’t see white streaks—over-folding deflates the mousse
Preventing a Soggy Crust:
- Press the crust firmly and evenly—loose crumbs will absorb moisture
- Make sure the crust is completely chilled before adding filling
- Serve within 2-3 days for optimal crust texture
Choosing the Right Pumpkin Puree:
- Always use plain “100% pumpkin” or “pumpkin puree”
- NEVER use “pumpkin pie filling” (it already contains sugar and spices and will throw off the recipe)
- Canned pumpkin is absolutely perfect for this—no need to roast fresh pumpkin
Make-Ahead Strategies:
- Make the crust up to 2 days ahead and keep it covered in the fridge
- The assembled pie is actually better after sitting overnight
- For maximum convenience, make it the morning before your dinner party
- Don’t add whipped cream garnish until just before serving—it deflates over time
Delicious Variations of Pumpkin Mousse Pie
Chocolate Pumpkin Mousse Pie: Use chocolate graham crackers for the crust and fold in ¼ cup mini chocolate chips into the filling for a delightful twist.
Ginger Snap Crust: Swap graham crackers for crushed gingersnap cookies. The spicy ginger flavor is absolutely divine with pumpkin!
Extra Spiced: Add an extra ½ teaspoon of cinnamon, a pinch of ground cloves, or a dash of fresh grated nutmeg for a more intensely spiced filling.
Bourbon Pumpkin Mousse: Add 1-2 tablespoons of bourbon to the pumpkin mixture for a sophisticated, adult version.
Layered Presentation: Create beautiful layers by piping half the mousse, adding a thin layer of plain whipped cream, then the remaining mousse.
Pretzel Crust: For a sweet-and-salty twist, make the crust with crushed pretzels instead of graham crackers (add an extra tablespoon of sugar).
Maple Sweetened: Replace half the powdered sugar with pure maple syrup for an extra layer of fall flavor.
Topping Ideas:
- Maple whipped cream (add maple syrup to taste)
- Caramel sauce drizzle
- Toasted pecans or walnuts
- Crushed gingersnap cookies
- A sprinkle of flaky sea salt
Storing Your Pumpkin Mousse Pie
Serving: This no bake pumpkin mousse pie recipe is best served cold, straight from the refrigerator. Let it sit at room temperature for about 5 minutes before slicing if you prefer a slightly softer texture. Use a sharp knife dipped in hot water and wiped dry between slices for clean cuts.
Storage: Cover the pie tightly with plastic wrap or store in an airtight container. Keep refrigerated for up to 2-3 days. The crust will gradually soften over time, so it’s best enjoyed within the first two days.
Freezing: While I don’t recommend freezing the assembled pie (the texture of the mousse can become slightly grainy and the crust soggy upon thawing), you can freeze the filling separately. Pour it into a freezer-safe container before adding to the crust. Freeze for up to 1 month. Thaw completely in the refrigerator overnight, give it a gentle stir, then pour into a fresh crust. The texture may be slightly less fluffy but still delicious!
FAQs About Pumpkin Mousse Pie
Can I use store-bought whipped cream? While fresh whipped cream gives the best texture and stability, you can use Cool Whip or similar products in a pinch. Use 2 cups (thawed if frozen) and fold it directly into the pumpkin mixture. The mousse will be slightly sweeter and the texture a bit different, but it will still be delicious! However, for the best results and most authentic mousse texture, I highly recommend whipping your own cream—it only takes a few minutes.
Can I make this vegan? Absolutely! Use coconut cream (the thick part from a can of full-fat coconut milk, chilled overnight) instead of heavy cream. Make the crust with vegan butter or coconut oil. The texture will be slightly different but still wonderful. Ensure your sugar is vegan-certified if that’s important to you.
Why isn’t my filling setting? The most common reasons are: not chilling long enough (give it the full 4 hours minimum), cream wasn’t whipped enough (should be soft peaks), or the mixture was overmixed after folding. Make sure your cream was cold to start and your bowl was chilled. If it’s still too soft after 4 hours, give it a few more hours or overnight.
How far in advance can I make this? The pie is actually best made 1 day ahead—the flavors develop beautifully overnight! You can make it up to 2 days in advance, though the crust will gradually soften. Make the crust up to 3 days ahead if you want to spread out the work.
Can I make individual servings? Yes! Use small mason jars, parfait glasses, or individual tart pans. Layer graham cracker crumbs on the bottom (you don’t need to make a full crust), add the mousse, and top with whipped cream. These make beautiful individual fall desserts for parties!
What if I don’t have pumpkin pie spice? Make your own! Mix together: ¾ teaspoon cinnamon, ¼ teaspoon ground ginger, ¼ teaspoon ground nutmeg, and a tiny pinch of ground cloves. Adjust to your taste preferences.
Conclusion
There you have it—the ultimate easy pumpkin pie recipe that requires absolutely no baking! This Pumpkin Mousse Pie is proof that the best desserts don’t have to be complicated. With its cloud-like texture, perfectly balanced spices, and stunning presentation, this no-bake pumpkin mousse pie is guaranteed to become your go-to fall dessert.
Whether you’re planning your Thanksgiving dessert ideas or simply want to celebrate autumn’s favorite flavor, this pie delivers on every level. The best part? While everyone is stressing over oven temperatures and pie crust perfection, you’ll be relaxing, knowing your showstopping dessert is already chilling in the fridge, getting better by the minute.
So grab that pumpkin puree, whip up some cream, and get ready to wow your family and friends with this incredible pumpkin spice dessert. Trust me, they’ll be asking for this recipe before they’ve even finished their first slice!
Your Turn!
Now I’d love to hear from you! Have you tried this Easy Pumpkin Mousse Pie recipe? What’s your favorite way to garnish it? Do you prefer the classic graham cracker crust or one of the fun variations? Drop a comment below and share your experience—I read every single one and love hearing your creative twists!
If you make this pie, snap a photo and share it on Instagram or Facebook. Tag me so I can see your beautiful creation and celebrate with you! And if you know someone who would love this no bake pumpkin mousse pie recipe, please share this post with them. Everyone deserves an easy, delicious way to enjoy fall flavors!
Happy baking (or should I say, happy not-baking?)!