Candy Cane Kiss Sugar Cookie Bars
Candy Cane Kiss Sugar Cookie Bars: There’s something magical about holiday baking that transforms an ordinary kitchen into a wonderland of sweet possibilities. As twinkling lights adorn homes and the scent of peppermint fills the air, I’m excited to share my absolute favorite festive dessert that combines simplicity with spectacular holiday flavor.
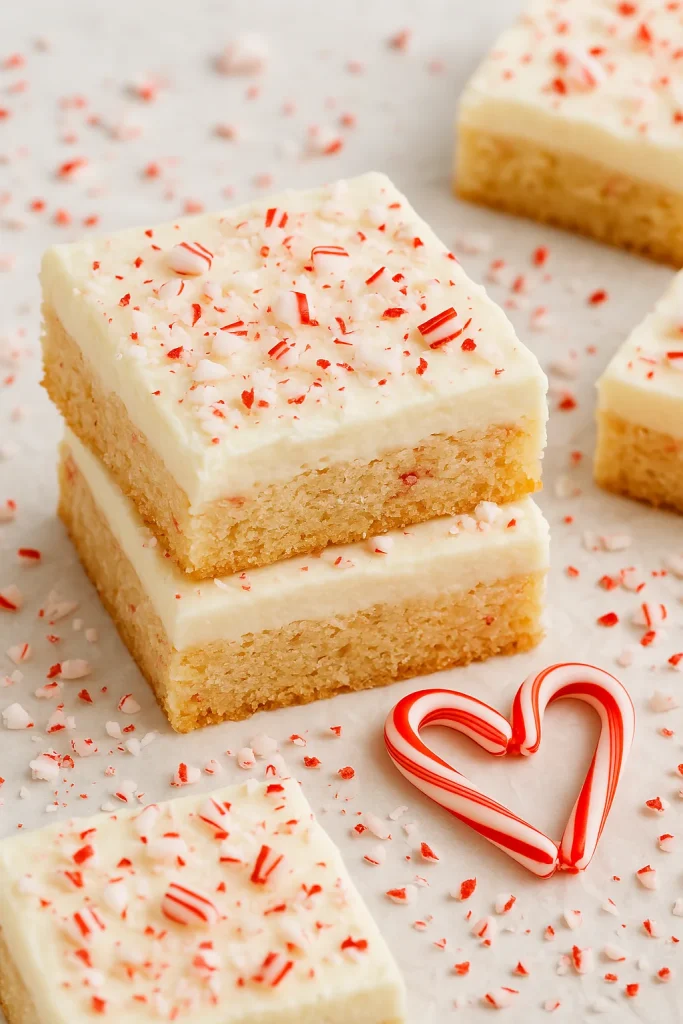
Forget the hassle of rolling, cutting, and decorating individual cookies. These delightful bars take all the beloved elements of a classic sugar cookie and transform them into an easy-to-make treat that’s guaranteed to dazzle at any holiday gathering. The soft, chewy sugar cookie base provides the perfect foundation for those iconic red-and-white striped Candy Cane Kisses, creating a dessert that’s as beautiful as it is delicious.
Candy Cane Kiss Sugar Cookie Bars Recipe Review
Baking Time and Nutrition Facts
24 Bars
15 Minutes
17 Minutes
175 Kcal
9g
14g
2g
3h30Minutes
2-3 Hours
Intermediate
Why These Bars NEED to Be on Your Holiday Baking List
- Super Easy: Skip the rolling pin! Just press the dough into a pan, bake, and top with Kisses – holiday baking doesn’t get simpler than this.
- Festive Flavor Explosion: The perfect marriage of buttery sugar cookie, cool peppermint, and creamy white chocolate creates a treat that tastes like Christmas in every bite.
- Visually Adorable: The pretty peppermint Kisses create an eye-catching holiday dessert with absolutely zero decorating skills required.
- Crowd-Pleasing: This recipe is a guaranteed hit with both kids and adults – watch them disappear from your cookie platter!
- Perfect for Parties & Gifts: These bars travel beautifully, cut cleanly, and package up perfectly for cookie exchanges or holiday gift baskets.
- Soft & Chewy Texture: Unlike some holiday desserts that can be dry or crumbly, these bars maintain that perfect soft-center-with-slightly-crisp-edge texture that cookie lovers crave.
Candy Cane Kiss Sugar Cookie Bars Ingredients
Key Ingredients
- For the Sugar Cookie Bar Base:
1 cup (2 sticks) unsalted butter, softened to room temperature
1 cup granulated sugar
1 large egg, room temperature
2 teaspoons pure vanilla extract
¼ teaspoon peppermint extract (optional, for extra mint flavor)
2½ cups all-purpose flour, spooned and leveled
½ teaspoon baking powder
½ teaspoon salt
- The Star Topping:
36-40 Candy Cane Hershey’s Kisses, unwrapped (about 9-10 oz package)
- Optional Decoration:
2 tablespoons crushed candy canes
Holiday sprinkles
¼ cup white chocolate chips, melted (for drizzling)
Essential Baking Tools:
- 9×13 inch baking pan
- Parchment paper
- Electric mixer
- Mixing bowls
- Rubber spatula
- Measuring cups and spoons
How To Make Candy Cane Kiss Sugar Cookie Bars
Instructions
- Prep Your Space: Preheat your oven to 350°F (175°C). Line your 9×13 inch baking pan with parchment paper, leaving an overhang on two sides for easy removal later.
- Make the Cookie Dough: In a large bowl, cream together the softened butter and sugar using an electric mixer until light and fluffy, about 2-3 minutes. Add the egg, vanilla extract, and peppermint extract (if using), and beat until well combined.
- Add Dry Ingredients: In a separate bowl, whisk together flour, baking powder, and salt. Gradually add this dry mixture to your wet ingredients, mixing on low speed just until combined. Chef Tip: Stop mixing as soon as the flour disappears! Overmixing will make your bars tough instead of tender.
- Press Into Pan: Transfer the dough to your prepared baking pan and press it into an even layer. For a perfectly smooth surface, use the bottom of a measuring cup to gently press and even out the dough.
- Bake to Perfection: Bake in your preheated oven for 15-17 minutes, or until the edges are just turning a light golden color and the center is set but not browned. Chef Tip: For the chewiest bars, err on the side of slightly underbaking – they’ll continue to cook a bit as they cool.
- The Kiss Topping (Timing is Everything!): Immediately after removing the pan from the oven, while the cookie base is still piping hot, press the unwrapped Candy Cane Kisses evenly across the surface. The residual heat will soften the Kisses and help them adhere to the cookie bars. Don’t press too hard – you want them to soften but maintain their distinctive shape.
- Cooling (Don’t Skip This Step!): Allow the bars to cool completely in the pan on a wire rack for at least 2-3 hours. This patience-testing step is critical – it allows the Kisses to set and the bars to firm up enough for clean cutting.
- Cutting Your Masterpiece: Once fully cooled, use the parchment paper overhang to lift the entire slab of cookie bars out of the pan. With a sharp knife, cut into squares of your desired size. For extra-clean cuts, refrigerate the bars for 30 minutes before cutting.
Tips For Perfect Candy Cane Kiss Sugar Cookie Bars
- Butter Temperature Matters: Make sure your butter is properly softened (you should be able to press a finger into it with light resistance) but not melted or too warm. This creates the perfect cookie texture.
- Measure Flour Correctly: Use the spoon-and-level method – spoon flour into your measuring cup and level it off with a knife. Scooping directly from the bag compacts the flour and can make your bars dry.
- The Parchment Paper Trick: Don’t skip the parchment paper with overhang! This isn’t just for easy cleanup – it ensures you can lift the entire slab out for perfect cutting without damaging your bars.
- Timing Those Kisses: Add the Kisses immediately after the bars come out of the oven. If the base cools too much, the Kisses won’t properly adhere.
- Watch The Clock: Set a timer for your Candy Cane Kisses – after about 2 minutes on the hot cookie base, they’ll be perfectly softened but still maintain their shape. If your kitchen is very warm, consider running a fan or opening a window to prevent over-melting.
- Cooling Patience: Complete cooling before cutting is absolutely non-negotiable! Rush this step and you’ll end up with a melty, messy (though still delicious) situation.
Fun Variations & Substitutions
- Kiss Variations: While Candy Cane Kisses are perfectly festive, these bars work beautifully with regular chocolate Kisses, Hugs, or any seasonal variety Hershey’s offers.
- Add Some Sparkle: Mix ¼ cup of holiday sprinkles directly into the cookie dough for a funfetti-style bar.
- White Chocolate Wonder: Fold ½ cup white chocolate chips into the cookie dough for extra richness and flavor that pairs perfectly with the peppermint.
- Minty Crunch: For serious peppermint fans, sprinkle crushed candy canes over the top immediately after adding the Kisses for additional texture and flavor.
How To Store Your Candy Cane Kiss Sugar Cookie Bars
These festive bars are the star of any holiday cookie platter! They’re perfect for:
- Christmas cookie exchanges
- Holiday office parties
- School celebrations
- Homemade gift packages (place in a decorative tin with parchment between layers)
Storage: Keep your bars in an airtight container at room temperature for up to 5 days. Place parchment paper between layers to prevent sticking.
Freezing: These bars freeze beautifully! For best results, freeze the uncut slab wrapped tightly in plastic wrap and then aluminum foil. Thaw at room temperature, then cut into squares. Alternatively, freeze individual cut bars in a single layer, then transfer to a container with parchment between layers.
The Perfect Holiday Tradition
There’s something undeniably special about these Candy Cane Kiss Sugar Cookie Bars. Perhaps it’s the way they combine nostalgic Christmas flavors with modern convenience, or maybe it’s simply the joy they bring to everyone who tries them. Whatever the magic, I’m convinced they deserve a permanent spot in your holiday baking rotation.
From my festive kitchen to yours, I hope these easy, delicious bars bring a little extra sweetness to your holiday season. The best traditions are the ones that create joy without stress – and these cookie bars deliver exactly that.
FAQs About Candy Cane Kiss Sugar Cookie Bars
Q: Can I use a different pan size?
A: Yes, but it will affect thickness and baking time. An 8×8 inch pan will create thicker bars that need 3-5 minutes longer to bake. A larger pan will create thinner bars that bake more quickly.
Q: My Kisses melted completely – what happened?
A: Your bars were likely too hot or your kitchen too warm. Next time, let the bars cool for 1-2 minutes before adding Kisses, or place in a cooler spot in your kitchen immediately after adding the Kisses.
Q: Can I make the dough ahead of time?
A: Absolutely! The dough can be refrigerated for up to 2 days. Let it sit at room temperature for about 30 minutes to soften enough to press into the pan.
Q: Where can I find Candy Cane Kisses?
A: These are seasonal items typically available from October through December in most grocery stores, big box retailers, and candy shops. If you can’t find them, order online or substitute regular Kisses with a sprinkle of crushed candy canes on top.
Q: Can I double this recipe?
A: Yes! Use two 9×13 inch pans rather than trying to fit it all in one deeper pan to maintain the proper cookie-to-Kiss ratio.
Have you tried making these festive treats? I’d love to see your creations! Share your photos in the comments below, or tag me on social media. And if these bars become part of your holiday tradition, spread the cheer by sharing this recipe with friends and family!