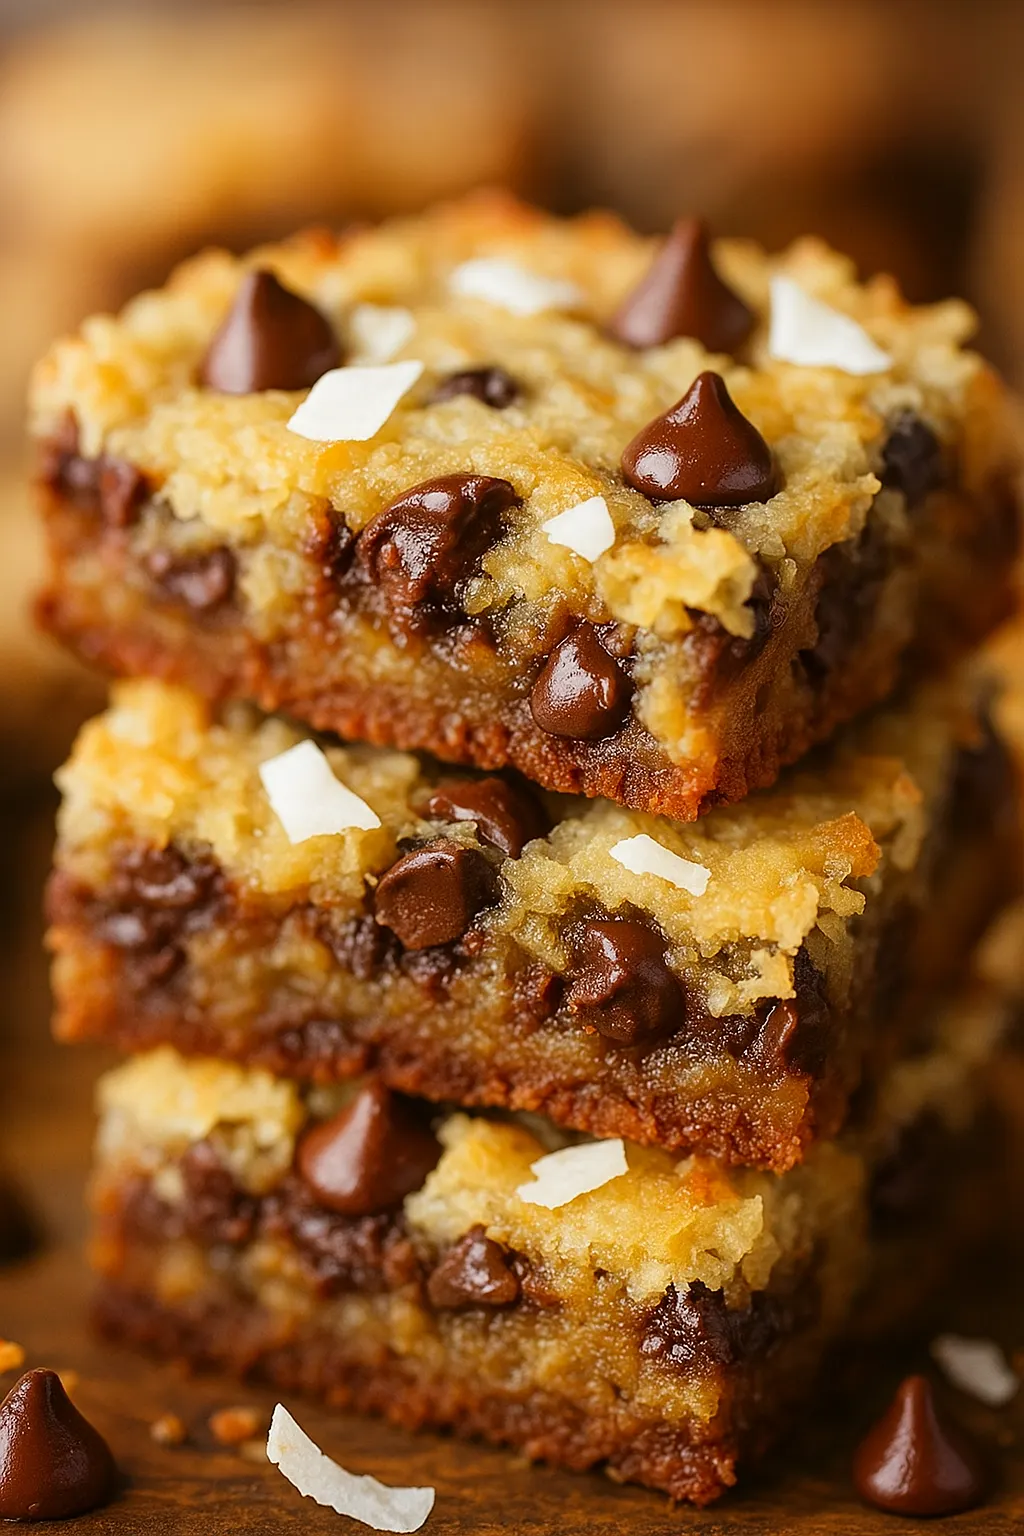
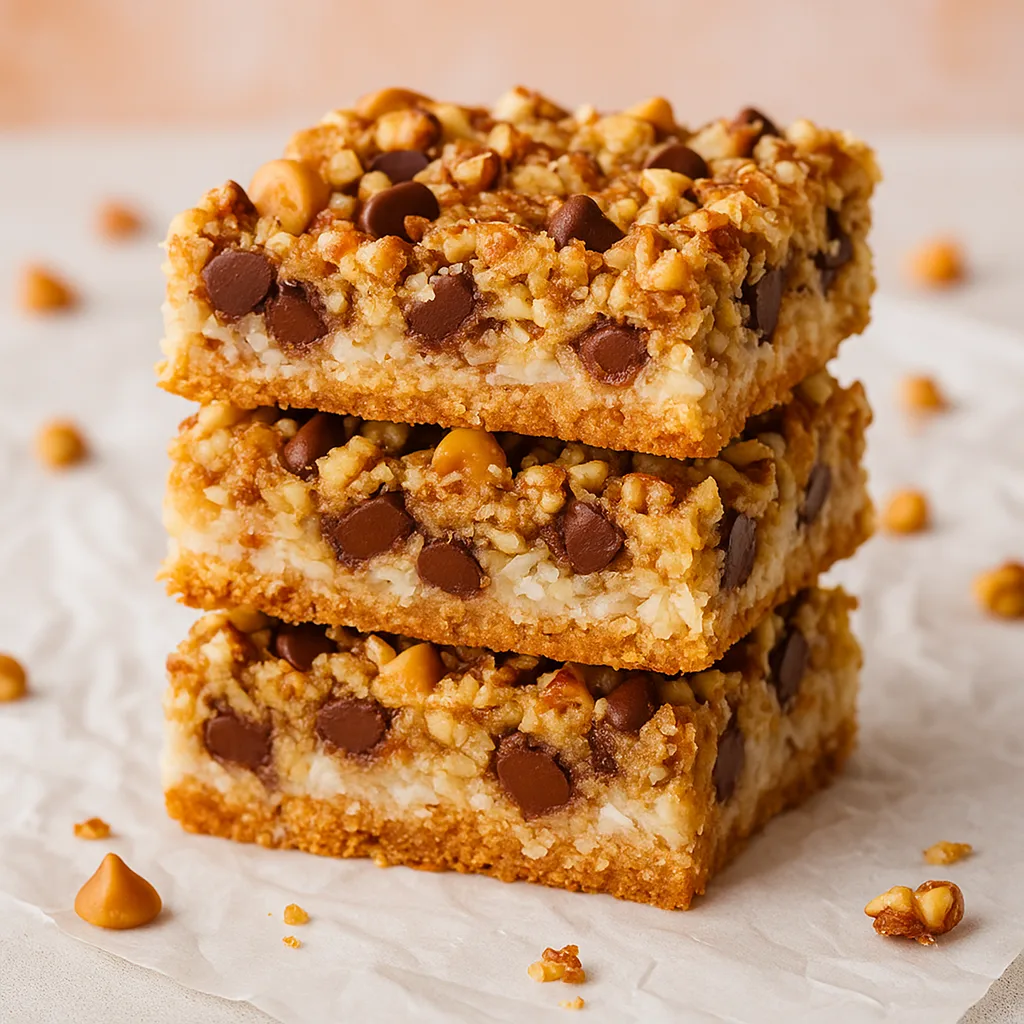
7 Layer Bars Recipe (Magic Bars)
Whether you knew them as 7 Layer Bars, Magic Bars, or Hello Dolly Bars, these iconic treats are about to become your new go-to recipe for every occasion. Here’s the beautiful truth: these bars are almost embarrassingly easy to make. We’re talking about 5 minutes of actual work, one pan, and absolutely zero mixing bowls. You literally layer ingredients in a baking dish, pop it in the oven, and walk away. The result? A dessert that looks impressive, tastes incredible, and disappears faster than you can say “Can I have the recipe?”
If you’ve been searching for the perfect potluck dessert, an easy recipe to make with kids, or a foolproof treat that uses simple pantry staples, you’ve just struck gold.
Why These 7 Layer Bars Are Pure Magic
Let me count the ways these graham cracker crust bars will change your baking life:
Ridiculously Easy: This is not an exaggeration. There are no mixing bowls, no creaming butter and sugar, no precise technique required. You build the entire dessert right in the pan, layer by layer. If you can sprinkle and pour, you can make these bars.
Minimal Effort, Maximum Reward: For about 5 minutes of active work (and I’m being generous with that estimate), you get a dessert that looks bakery-worthy and tastes like you spent all afternoon in the kitchen. The combination of textures—crispy, gooey, crunchy, chewy—is absolutely addictive.
The Ultimate Potluck Hero: These bars travel beautifully, cut into perfect squares, and appeal to virtually everyone. They’re always the first dessert to vanish from the table, and people will absolutely ask for the recipe. Pro tip: bring copies of the recipe with you because you’ll need them.
Endlessly Customizable: Don’t like coconut? Leave it out. Prefer dark chocolate? Swap the chips. Want to make them nut-free for school? Easy fix. The basic formula is so forgiving that you can adapt it to any dietary preference or flavor craving.
Pantry Staples: Graham crackers, chocolate chips, sweetened condensed milk, coconut, and nuts are ingredients many home bakers already have on hand. No special trips to specialty stores or hunting down obscure ingredients.
7 Layer Bars Recipe Overview
Baking Time and Nutrition Facts
24 Bars
10 Minutes
30 Minutes
2 Hours
2H40Min
Easy
220 kcl
20 g
What Are 7 Layer Bars Called? The Name Game
One of the most charming things about this recipe is its multiple personalities. Depending on where you grew up or who taught you to make them, you might know these as:
- 7 Layer Bars – Named for the seven distinct layers that make up the dessert
- Magic Bars – Because the way they bake together seems like pure magic
- Hello Dolly Bars – A vintage name that adds nostalgic charm
All three names refer to the exact same beloved recipe. The “magic” happens thanks to the sweetened condensed milk, which acts as both a binder and a sweetener, melting into all the layers as it bakes and creating that signature gooey texture. No matter what you call them, the result is the same: an irresistible, crowd-pleasing dessert that’s been a favorite for generations.
7 Layer Bars Ingredient List
Here’s what makes these easy cookie bars so special. Each layer plays a specific role in creating that perfect bite:
Key Ingredients
Layer 1 – Butter (½ cup, unsalted, melted): Creates the foundation and helps bind the crust together.
Layer 2 – Graham Cracker Crumbs (1½ cups): You can use pre-crushed crumbs or crush about 10-11 full graham cracker sheets yourself. This forms your buttery, slightly sweet base.
Layer 3 – Sweetened Condensed Milk (1 can, 14 ounces): This is the secret ingredient, the “glue” that holds everything together. As a pastry chef, I can tell you this is what makes the magic happen. The milk’s proteins and sugars caramelize slightly as they bake, binding all the layers while adding that signature sweetness. Important: This is NOT evaporated milk! Sweetened condensed milk is thick, sweet, and sticky—essential for these bars.
Layer 4 – Semi-Sweet Chocolate Chips (1 cup): Classic, beloved, and the chocolate flavor everyone expects.
Layer 5 – Butterscotch Chips (1 cup): The traditional choice that adds a caramel-like sweetness and makes these bars truly nostalgic.
Layer 6 – Shredded Sweetened Coconut (1⅓ cups): Adds texture, tropical flavor, and that beautiful golden color on top.
Layer 7 – Chopped Pecans or Walnuts (1 cup): The crunchy finale. Pecans are the classic choice, but walnuts work beautifully too.
How To Make 7 Layer Bars
Prep Work
Instructions
- Step 1: Preheat your oven to 350°F (175°C).
- Step 2: Line your 9×13-inch baking pan with parchment paper, leaving about 2 inches of overhang on two opposite sides. These overhangs will act as “handles” to lift the entire batch of bars out of the pan later. Trust me—this single step is the difference between perfect bars and a frustrating mess. Press the parchment paper into the corners and up the sides of the pan.
The Layering Magic
Instructions
- Step 3: Pour the melted butter into the bottom of the prepared pan, tilting to spread it evenly across the entire surface.
- Step 4: Sprinkle the graham cracker crumbs evenly over the butter. Using your hands or the bottom of a measuring cup, press the crumbs down firmly and evenly to create a compact crust. Don’t skip the pressing—this prevents a crumbly, loose base.
- Step 5: Pour the entire can of sweetened condensed milk over the graham cracker crust. Try to distribute it as evenly as possible, though it doesn’t have to be perfect. Use the back of a spoon to gently spread it if needed.
- Step 6: Sprinkle the chocolate chips evenly over the condensed milk layer.
- Step 7: Sprinkle the butterscotch chips over the chocolate chips.
- Step 8: Spread the shredded coconut evenly over the chips.
- Step 9: Sprinkle the chopped nuts over everything as the final layer.
- Step 10: Using your hands or a spatula, gently press down on all the toppings to embed them slightly into the sweetened condensed milk. This helps everything stick together as it bakes.
Bake to Perfection
Instructions
- Step 11: Bake for 25-30 minutes. You’re looking for edges that are golden brown and a center that’s bubbly and set. The coconut on top should be lightly toasted. Don’t overbake—you want these bars gooey, not dry.
The Most Important Step: Cooling
Instructions
- Step 12: Remove the pan from the oven and place it on a wire rack. Now comes the hard part—you MUST let these bars cool completely at room temperature before cutting them. This usually takes about 2 hours. I know it’s tempting, but cutting them while they’re warm will result in a gooey, falling-apart mess. The sweetened condensed milk needs time to set as it cools, transforming from liquid gold into the chewy binder that holds everything together.
- Step 13 (Optional but Recommended): For even cleaner cuts, once the bars have cooled to room temperature, refrigerate them for 1-2 hours. Chilled bars slice beautifully.
- Step 14: Use the parchment paper “handles” to lift the entire batch out of the pan and onto a cutting board. Use a large, sharp knife to cut into squares, wiping the blade clean between cuts for the neatest presentation.
Secrets for Perfect 7 Layer Bars
The Parchment Paper Sling: I cannot stress this enough—lining your pan with parchment paper with overhang is the single most important technique for success. It guarantees easy removal and prevents any sticking. This is non-negotiable for perfect bars.
Press That Crust: When you add the graham cracker crumbs, really press them down firmly into the melted butter. A compact crust won’t crumble when you cut the bars.
Even Distribution Is Your Friend: Try to spread each layer as evenly as possible. This ensures every bite has the perfect ratio of all seven layers.
Don’t Overbake: The bars are done when the edges are golden and the center is bubbly. The middle might look slightly underdone, but it will set perfectly as it cools. Overbaking creates dry, hard bars instead of gooey ones.
Patience With Cooling: I know I mentioned this already, but it bears repeating because this is where most people go wrong. The bars need to cool completely. The sweetened condensed milk is liquid when hot and firms up as it cools. Give it time to work its magic.
Tips for Clean Cuts: Chill the bars before cutting, use a large sharp knife, and wipe the blade with a damp cloth between each cut. For extra-clean edges, you can even heat the knife under hot water, dry it, and then cut.
Fun Variations & Swaps
The beauty of this 7 layer bars recipe is its flexibility. Here are some popular variations:
Nut-Free Version: Simply omit the nuts entirely, or substitute with old-fashioned rolled oats (about ¾ cup) or roasted sunflower seeds for crunch. Many school bake sales require nut-free treats, and these bars are perfect for that.
Different Chip Combinations: Swap the butterscotch chips for peanut butter chips, white chocolate chips, dark chocolate chips, or even mint chocolate chips. You can also use a combination—try 1 cup of semi-sweet chocolate and 1 cup of peanut butter chips.
Add M&Ms: For a colorful, kid-friendly version, replace one of the chip layers with M&Ms.
Crust Variations: Instead of graham crackers, try crushed Oreo cookies (remove the cream first), Biscoff cookies, vanilla wafers, or shortbread cookies. Each creates a different flavor profile but works with the same technique.
Add a Drizzle: Once the bars have cooled completely, drizzle melted chocolate or white chocolate over the top for an extra-fancy presentation.
Tropical Version: Use macadamia nuts instead of pecans and add some dried pineapple chunks for a Hawaiian-inspired twist.
S’mores Bars: Add mini marshmallows on top during the last 5 minutes of baking for a s’mores variation.
How to Store Your 7 Layer Bars
Room Temperature: Store the cut bars in an airtight container at room temperature for up to 5-7 days. Layer them with parchment or wax paper to prevent sticking.
Refrigeration: You can also store them in the refrigerator if you prefer a firmer texture or if your kitchen is very warm. They’ll last up to 2 weeks refrigerated.
Freezing: These bars freeze beautifully! Place them in a single layer on a baking sheet and freeze until solid, then transfer to a freezer-safe container or bag with parchment paper between layers. They’ll keep for up to 3 months. Thaw at room temperature for about 30 minutes before serving.
FAQs About 7 Layer Bars
Can I make these without coconut or nuts?
Absolutely! Simply omit whichever ingredient you don’t want. The bars will still be delicious. If you’re omitting both, consider adding an extra ½ cup of chocolate chips or butterscotch chips to make up for the volume.
Why did my 7 layer bars fall apart?
This almost always happens because the bars were cut while still warm. The sweetened condensed milk needs to cool completely to set and act as the binder. Always wait until the bars are completely cool—or better yet, chilled—before cutting.
Can I use evaporated milk instead of sweetened condensed milk?
No! This is a common question but a firm no. Evaporated milk is simply milk with some water removed—it’s not sweet and it won’t bind the layers together. Sweetened condensed milk is milk that’s been cooked down with sugar until it’s thick, sweet, and sticky. It’s the magic ingredient that makes these bars work. There is no substitute.
How do I know when the bars are done baking?
Look for golden brown edges and a bubbly center. The coconut on top should be lightly toasted. The center might look slightly underdone, but it will set as it cools.
Can I double this recipe?
Yes! Use two 9×13-inch pans rather than one larger pan to maintain the correct layer proportions and baking time.
Do these need to be refrigerated?
Not necessarily. They’re stable at room temperature for up to a week in an airtight container. However, refrigerating them makes for cleaner cuts and a firmer texture if that’s your preference.
The Magic Lives On
There’s something deeply satisfying about a recipe that’s been passed down through generations, unchanged because it’s already perfect. These 7 layer bars—whether you call them Magic Bars or Hello Dolly Bars—represent the best of classic American baking: simple, reliable, delicious, and made with love.
They’re the bars your grandmother brought to every gathering, the dessert that fueled countless bake sales, and the sweet treat that brings everyone together. And now, with this foolproof recipe in your hands, you can continue that tradition and create your own delicious memories.
The best part? You’re just 30 minutes away from pulling a pan of these beauties out of your oven. No special skills required, no complicated techniques to master—just layer, bake, cool, and enjoy.
So what are you waiting for? Preheat that oven, line that pan with parchment paper, and get ready to make some magic. These bars are calling your name, and they’re about to become your most-requested recipe.
Make a batch this weekend and let me know in the comments: What do YOU call these bars? And what’s your favorite variation? Share this recipe with anyone who needs a foolproof, crowd-pleasing dessert in their life—because everyone deserves to experience the magic!