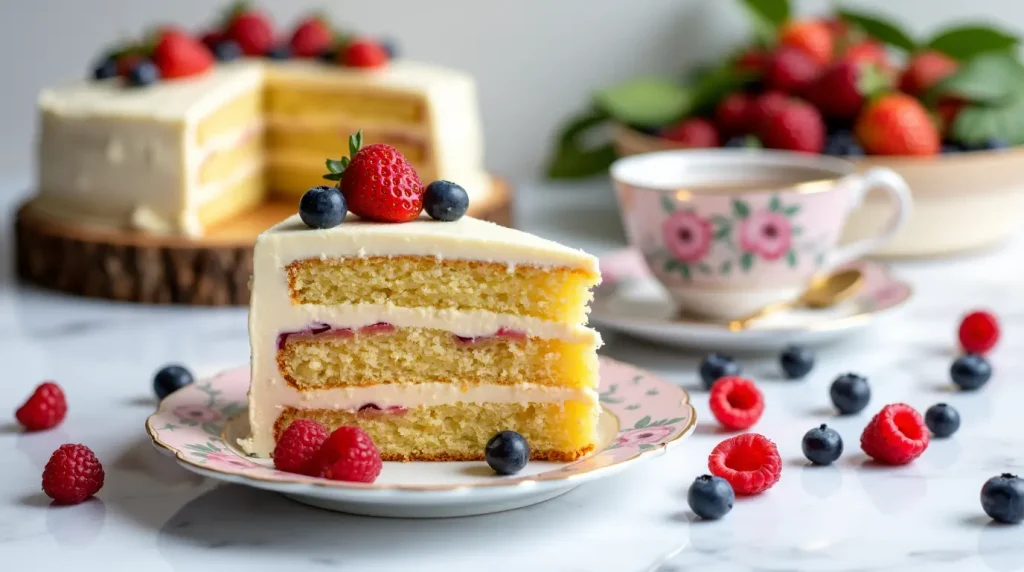
Vanilla Naked Cake Recipe
There’s something irresistibly charming about a vanilla naked cake. With its partially frosted layers showcasing the beautiful cake beneath, this dessert strikes the perfect balance between rustic elegance and modern simplicity. Whether you’re planning a wedding, birthday celebration, or simply want to create something special for a weekend gathering, learning how to make a vanilla naked cake is a skill worth mastering.
Let’s dive into creating this showstopper that not only looks stunning but tastes divine. This homemade naked cake is about to become your new signature dessert!
What is a Naked Cake?
A naked cake is essentially a cake that’s served with minimal or no outer frosting, allowing the layers to peek through. This unfrosted cake style has gained popularity for its natural appearance and versatility – perfect for everything from casual gatherings to elegant weddings.
The Allure of Naked Cakes
Naked cakes strip away the pretense. By reducing or eliminating the outer layer of frosting, they showcase the cake’s natural texture and the artistic layering within. This minimalist approach creates a rustic yet elegant dessert perfect for everything from woodland weddings to sophisticated dinner parties.
What I love most about naked cakes is their honesty. Each layer, each swirl of buttercream between tiers, even the occasional crumb—all become part of the visual story. There’s no hiding behind a perfect exterior, just the simple joy of a well-made cake presented with confidence.
Vanilla Naked Cake Recipe Overview
Baking Time and Nutrition Facts
14 Slices
40 Minutes
30 Minutes
450 Kcal
90 Minutes
55g
24g
5g
40g
Why You’ll Love This Simple Vanilla Cake
- Foolproof recipe: Even beginners can achieve beautiful results
- Perfectly moist: Special techniques ensure a tender, never-dry texture
- Versatile: Dress it up or down depending on the occasion
- Time-saving: Less frosting means less fuss!
Ingredients for the Best Vanilla Cake Recipe
Key Ingredients
- For the Vanilla Cake Layers
3 cups (345g) cake flour
1 tablespoon baking powder
1/2 teaspoon baking soda
1/2 teaspoon salt
1 cup (226g) unsalted butter, softened
2 cups (400g) granulated sugar
4 large eggs, room temperature
2 egg whites, room temperature
2 tablespoons pure vanilla extract (yes, tablespoons!)
1 cup (240ml) buttermilk, room temperature
1/4 cup (60g) sour cream, room temperature
- For the Light Vanilla Buttercream:
1 1/2 cups (340g) unsalted butter, softened
5 cups (600g) powdered sugar, sifted
1/4 cup (60ml) heavy cream
2 teaspoons pure vanilla extract
1/4 teaspoon salt
- Optional Garnishes:
Fresh berries (strawberries, blueberries, raspberries)
Edible flowers
Fresh herbs (mint, thyme)
Dusting of powdered sugar
Tools You Will Need
- Large mixing bowl
- Measuring cups and spoons
- Whisk
- Silicone spatula
- Parchment paper or silicone baking mats
- Round Cake Pan
- Wire cooling rack
How To Make Vanilla Naked Cake
Instructions
- Preparing the Cake Layers
1– Prep Work: Preheat your oven to 350°F (175°C). Grease and line three 8-inch cake pans with parchment paper circles.
2- Mix Dry Ingredients: In a medium bowl, whisk together the cake flour, baking powder, baking soda, and salt. Set aside.
3- Cream Butter and Sugar: In a stand mixer fitted with the paddle attachment, beat the butter on medium-high speed until creamy, about 1 minute. Add the sugar and beat until light and fluffy, about 3-4 minutes. Scrape down the sides of the bowl as needed.
4- Add Eggs: Add the eggs and egg whites, one at a time, beating well after each addition. Beat in the vanilla extract.
5- Combine Wet Ingredients: In a separate small bowl, whisk together the buttermilk and sour cream.
6- Alternate Additions: With the mixer on low speed, add the dry ingredients in three portions, alternating with the buttermilk mixture, beginning and ending with the dry ingredients. Mix only until combined after each addition.
7- Bake: Divide the batter evenly between the prepared pans. Bake for 25-28 minutes, or until a toothpick inserted into the center comes out clean. The tops should spring back when lightly pressed.
8- Cool: Allow the cakes to cool in the pans for 15 minutes, then remove them and place on wire racks to cool completely. - Making the Buttercream
1– Beat Butter: In a stand mixer fitted with the paddle attachment, beat the butter on medium-high speed until creamy and light, about 5 minutes.
2- Add Sugar Gradually: Reduce speed to low and gradually add the sifted powdered sugar, about 1 cup at a time, mixing well after each addition.
3- Add Remaining Ingredients: Add the heavy cream, vanilla extract, and salt. Beat on low speed until incorporated, then increase to medium-high and beat for 2-3 minutes until light and fluffy.
- Assembling Your Homemade Naked Cake
1– Level Cakes: If needed, use a serrated knife to level the tops of your cake layers.
2- First Layer: Place one cake layer on your serving plate or cake stand. Spread about 1/2 cup of buttercream on top in an even layer.
3- Stack: Place the second cake layer on top and repeat with another 1/2 cup of buttercream.
4- Complete Stack: Add the final cake layer on top.
5- Crumb Coat: Apply a thin layer of buttercream around the entire cake to lock in crumbs. This is the foundation of the naked cake look.
6- Create the Naked Effect: Using an offset spatula or bench scraper, scrape around the sides of the cake, removing excess frosting until you can partially see the cake layers through the frosting. Leave the top with a slightly thicker layer of frosting.
7- Chill: Refrigerate the cake for 20-30 minutes to set the frosting.
8- Garnish: Just before serving, decorate with fresh berries, edible flowers, or a light dusting of powdered sugar as desired.

Frosting Options for Your Vanilla Naked Cake
While traditional buttercream is the most popular choice for a vanilla naked cake with berries or other garnishes, you can experiment with these alternatives:
- Cream Cheese Frosting: For a slightly tangy option that pairs wonderfully with fresh fruit.
- Whipped Cream Frosting: For an even lighter option, perfect for summer gatherings.
- Mascarpone Frosting: For an elegant Italian twist with a subtle flavor that complements vanilla beautifully.
- Swiss Meringue Buttercream: For a silkier, less sweet option that creates a beautiful semi-transparent effect.
Tips & Tricks for the Perfect Homemade Naked Cake
- Room Temperature Ingredients: This is non-negotiable for achieving that perfect texture in your easy vanilla cake recipe.
- Don’t Overmix: Stop mixing as soon as the ingredients are incorporated to avoid a tough cake.
- Measure Properly: For the best vanilla cake recipe results, use a kitchen scale if possible. If using cups, spoon and level your flour rather than scooping.
- Cake Strips: Consider using wet cake strips around your pans for more even baking.
- Chill Before Decorating: A chilled cake is much easier to frost with clean lines.
- Make Ahead: The cake layers can be made 1-2 days ahead and wrapped well in plastic wrap. You can even freeze them for up to 3 months.
- Final Assembly Timing: For the freshest presentation, assemble your naked cake no more than 24 hours before serving.
- Storage: Store your finished naked cake in the refrigerator, but bring to room temperature for about 30 minutes before serving for the best flavor and texture.
Delicious Variations on This Vanilla Naked Cake Recipe
Vanilla Naked Cake with Berry Filling
Add a layer of macerated berries between each cake layer for a burst of fruity flavor.
Lemon Vanilla Naked Cake
Add 2 tablespoons of lemon zest to the batter and a tablespoon of lemon juice to the frosting for a citrusy twist.
Vanilla Almond Naked Cake
Replace 1/2 teaspoon of vanilla extract with almond extract in both the cake and frosting for a subtle nutty flavor.
Easy Vanilla Naked Cake for Beginners with Colored Layers
Divide your batter and add a few drops of food coloring to each portion for a colorful surprise when the cake is sliced.
Vanilla Naked Cake with Caramel Drizzle
Add a drizzle of caramel sauce between layers and on top for an extra decadent treat.
Storage and Make-Ahead Tips
The exposed sides of an unfrosted cake can dry out faster than fully frosted cakes. To keep your vanilla naked cake fresh:
- Assemble the cake the same day you plan to serve it for best results
- If needed, you can bake the layers 1-2 days ahead, wrap them well in plastic wrap once cooled, and store at room temperature
- Once assembled, store in a cake dome or loosely tent with plastic wrap
- The cake will stay fresh for up to 2 days at room temperature
Why I’ll Never Go Back to Fully-Frosted
There’s something wonderfully honest about a naked cake. In our filtered, polished world, there’s refreshing authenticity in a dessert that celebrates its natural structure rather than hiding beneath a perfect exterior.
I’ve served this vanilla naked cake at birthdays, baby showers, and even my own anniversary celebration. Each time, guests comment not just on the flavor but on how beautiful the cake looks—how they can see the care that went into its creation.
Perhaps that’s the true magic of a naked cake: it reveals the process, celebrates the craft, and reminds us that sometimes, the most beautiful things are those that remain closest to their natural state.
Whether you’re an experienced baker or trying your hand at layer cakes for the first time, I hope this vanilla naked cake brings joy to your table and beauty to your celebrations.Réessayer
Solving Common Cake Baking Mistakes
Dry Cake
- Problem: You followed the recipe but ended up with dry cake.
- Solutions:
- Don’t overbake – check your cake 2 minutes before the suggested baking time.
- Make sure you measured the flour correctly – too much flour dries out cakes.
- Store properly – cover the cake layers tightly if not frosting immediately.
- Brush cake layers with simple syrup (equal parts sugar and water, heated until dissolved then cooled) before frosting.
Uneven Layers
- Problem: Your cake layers rise unevenly or dome too much.
- Solutions:
- Use cake strips around your pans (you can make these with damp cloth strips wrapped in foil).
- Make sure your oven temperature is accurate – use an oven thermometer.
- Don’t place pans too close to each other or the sides of the oven.
- Rotate pans halfway through baking (quickly, without slamming the oven door).
Cracked Tops
- Problem: The tops of your cakes crack during baking.
- Solutions:
- Your oven may be too hot – check with an oven thermometer.
- Don’t open the oven door during the first 20 minutes of baking.
- Don’t overmix the batter after adding flour.
Sinking Middle
- Problem: The center of your cake sinks after baking.
- Solutions:
- Make sure your baking powder is fresh (test by adding a small amount to hot water – it should fizz).
- Don’t open the oven door until the cake is at least 80% done.
- Make sure you’re using the correct pan size – too small and the cake may collapse.
Frosting Issues
- Problem: Buttercream is too soft or slides off the cake.
- Solutions:
- Make sure your cake layers are completely cool before frosting.
- If your kitchen is warm, refrigerate the buttercream for 15-20 minutes before using.
- Chill the cake between frosting layers.
- For a naked cake, less frosting means less chance of sliding.
Frequently Asked Questions
Can I make this cake in advance?
Yes! You can bake the cake layers up to 2 days ahead. Once cooled, wrap them tightly in plastic wrap and store at room temperature. The buttercream can be made 3 days ahead and refrigerated (bring to room temperature and re-whip before using). Once assembled, the cake is best enjoyed within 2 days.
Can I use cake flour instead of all-purpose?
Absolutely! Cake flour will give you an even softer, more tender crumb. Use 3 1/4 cups (345g) of cake flour instead of the all-purpose flour.
Do I really need room temperature ingredients?
Yes! Room temperature butter, eggs, and milk combine more easily, creating a smoother batter that traps air for a lighter cake. Cold ingredients don’t blend properly and can result in a dense, uneven cake.
Can I bake this in two pans instead of three?
Yes, but you’ll need to increase the baking time to about 28-32 minutes. For a taller cake with thinner layers, you could use four 6-inch pans instead.
My cake layers aren’t perfectly even. Should I start over?
Not at all! The beauty of a naked cake is its rustic charm. Small imperfections add character. If the layers are dramatically uneven, you can trim them, but slight variations are perfectly fine.
What if I don’t have an electric mixer?
While an electric mixer makes the process easier, you can cream butter and sugar by hand using a wooden spoon (it will take more effort and time). For the buttercream, an electric mixer is strongly recommended – hand-mixing won’t incorporate enough air.
Can I add fruit between the layers?
Yes! Fresh berries or thinly sliced fruit work beautifully between layers. Just be aware that very juicy fruits might make the frosting slide, so pat them dry first.
Ready To Bake ?!
This vanilla naked cake recipe proves that sometimes less is truly more. The beauty of this dessert lies in its simplicity—letting the quality ingredients and careful technique shine through. Whether you’re making this homemade naked cake for a special celebration or simply to enjoy with afternoon tea, it’s bound to become a favorite in your baking repertoire.
Have you tried making a vanilla naked cake before? What are your favorite garnishes to use? Share your experiences in the comments below!