Tiramisu Cheesecake Dessert Recipe
Close your eyes and imagine the first forkful of this extraordinary creation: the rich, velvety tang of classic cheesecake melding perfectly with the intoxicating coffee, cocoa, and mascarpone notes of authentic tiramisu. Each bite delivers the perfect balance – the deep espresso-soaked ladyfinger base, the luxurious mascarpone-infused cheesecake filling, and that final whisper of cocoa dust that tells your palate this is no ordinary dessert.
What you’re about to discover is the ultimate dessert hybrid – a sophisticated showstopper that transforms two beloved classics into something entirely new yet comfortingly familiar. This Tiramisu Cheesecake isn’t merely a recipe; it’s an experience, a celebration, and the answer to the question: “What should I make when I need to impress absolutely everyone?”
Don’t be intimidated by its elegant appearance. I’m about to guide you through every step of creating this masterpiece with precision and clarity. By the time you’re finished, you’ll have mastered a dessert worthy of the finest Italian pasticceria, right in your own kitchen.
Why This Tiramisu Cheesecake is Pure Genius
- Two Iconic Desserts, One Unforgettable Treat: The perfect marriage of creamy, tangy cheesecake with the coffee-kissed elegance of traditional tiramisu.
- Rich Coffee Infusion: The authentic essence of tiramisu comes through in perfectly soaked ladyfingers that deliver that distinctive espresso punch.
- Velvety Cheesecake Perfection: A silky-smooth cheesecake layer enhanced with mascarpone creates a texture that simply melts on the tongue.
- Elegant Presentation: With its naturally beautiful layers and contrasting textures, this dessert is visually stunning with minimal effort.
- Sophisticated & Indulgent: Impressive enough for special occasions yet deeply satisfying for any moment deserving of extraordinary sweetness.
- Surprisingly Achievable: While it looks complex, our methodical approach breaks this recipe into manageable steps that ensure success.
This dessert carries the legacy of two culinary traditions: the American love affair with cheesecake and the Italian artistic approach to coffee-infused dolci. Like the best culinary innovations, it honors its origins while creating something entirely new – perfect for holidays, celebrations, or simply elevating an ordinary evening to something memorable.
Tiramisu Cheesecake Recipe Overview
Baking Time and Nutrition Facts
12 Slices
45 Minutes
70 Minutes
425 Kcal
32g
8g
22g
10 Hours
80 Minutes
Moderate
Essential Ingredients for Tiramisu Cheesecake
Key Ingredients
- For the Coffee-Soaked Base
24 ladyfingers (Savoiardi biscuits) (about 7 oz/200g)
1 cup (240ml) strong brewed espresso or very strong coffee, cooled
2 tablespoons coffee liqueur such as Kahlúa or Marsala wine (optional, but recommended for authentic flavor)
- For the Cheesecake Filling
16 oz (455g) full-fat cream cheese, softened to room temperature (CRITICAL!)
8 oz (225g) mascarpone cheese, room temperature
¾ cup (150g) granulated sugar
3 large eggs, room temperature
2 large egg yolks, room temperature
¼ cup (60ml) heavy cream, room temperature
1 tablespoon pure vanilla extract
1 tablespoon coffee liqueur (optional)
- For the Topping
2-3 tablespoons unsweetened cocoa powder (for dusting)
Chocolate shavings (optional)
Whipped cream rosettes (optional)
Chef’s Note: The room temperature ingredients aren’t merely a suggestion – they’re absolutely essential for achieving that silky-smooth texture that defines a perfect cheesecake. Cold cream cheese or mascarpone will result in lumps that no amount of mixing can remedy. Set your dairy ingredients out at least 2 hours before beginning.
Creating Your Tiramisu Cheesecake
Preparation
Instructions
- Prepare your workspace: Position an oven rack in the middle position and preheat your oven to 325°F (165°C).
- Prepare the springform pan: Wrap the outside of your springform pan with a double layer of heavy-duty aluminum foil, ensuring it comes at least 2 inches up the sides. This critical step prevents water from seeping into your cheesecake during baking.
- Brew your coffee: Make a cup of strong espresso or very strong coffee and allow it to cool completely. Once cooled, stir in the coffee liqueur if using.
Creating the Ladyfinger Base
Instructions
- Prepare the coffee soak: Pour your cooled coffee mixture into a shallow dish wide enough to fit the ladyfingers.
- Soak and arrange ladyfingers: Working quickly, dip each ladyfinger into the coffee mixture for just 1-2 seconds per side – they absorb liquid rapidly! Arrange them tightly in the bottom of your prepared springform pan, breaking pieces as needed to fill gaps.
Chef’s Tip: The perfect ladyfinger is moist but not soggy. A quick dip creates the ideal texture – you still want some structure to support your cheesecake.
Making the Cheesecake Filling
Instructions
- Beat the cheeses: In the bowl of your stand mixer fitted with the paddle attachment (or using a hand mixer), beat the softened cream cheese and mascarpone at medium-low speed until completely smooth and free of lumps, about 2 minutes. Scrape down the sides of the bowl frequently.
- Add sugar: With the mixer running on low, gradually add the sugar. Once incorporated, increase to medium speed and beat until the mixture is silky smooth, about 2 minutes.
- Add eggs: Reduce to LOW speed (crucial to prevent incorporating too much air). Add eggs and egg yolks one at a time, allowing each to fully incorporate before adding the next. Scrape down the bowl after each addition.
- Finish the batter: Still on low speed, mix in the heavy cream, vanilla extract, and coffee liqueur (if using) just until combined. The mixture should be completely smooth but not over-beaten. Chef’s Secret: Over-mixing after adding eggs can trap air in the batter, leading to cracks during baking. Keep your mixer on low and mix just until ingredients are incorporated.
Assembly and Baking
Instructions
- Pour the filling: Gently pour your cheesecake batter over the ladyfinger base, smoothing the top with a spatula.
- Prepare the water bath: Place your foil-wrapped springform pan into a larger roasting pan. Place on the oven rack, then carefully pour hot water into the roasting pan until it reaches about halfway up the sides of the springform pan.
- Bake with patience: Bake at 325°F (165°C) for 60-70 minutes. The cheesecake is done when the edges are set but the center still has a slight wobble when gently shaken – it will continue to set as it cools.
- Cool gradually: When done, turn off the oven, crack the door open slightly, and let the cheesecake cool in the oven for 1 hour. This gradual cooling is the secret to a crack-free surface.
- Continue cooling: Remove from the water bath and place on a cooling rack. Run a thin knife around the edges to prevent cracking as it cools. Cool completely at room temperature (about 2 hours).
- Chill thoroughly: Cover and refrigerate for at least 6 hours, preferably overnight. This resting period allows the flavors to meld and the texture to perfect itself.
The Final Touch
Instructions
- Unmold carefully: Release the springform pan sides and transfer the cheesecake to a serving plate.
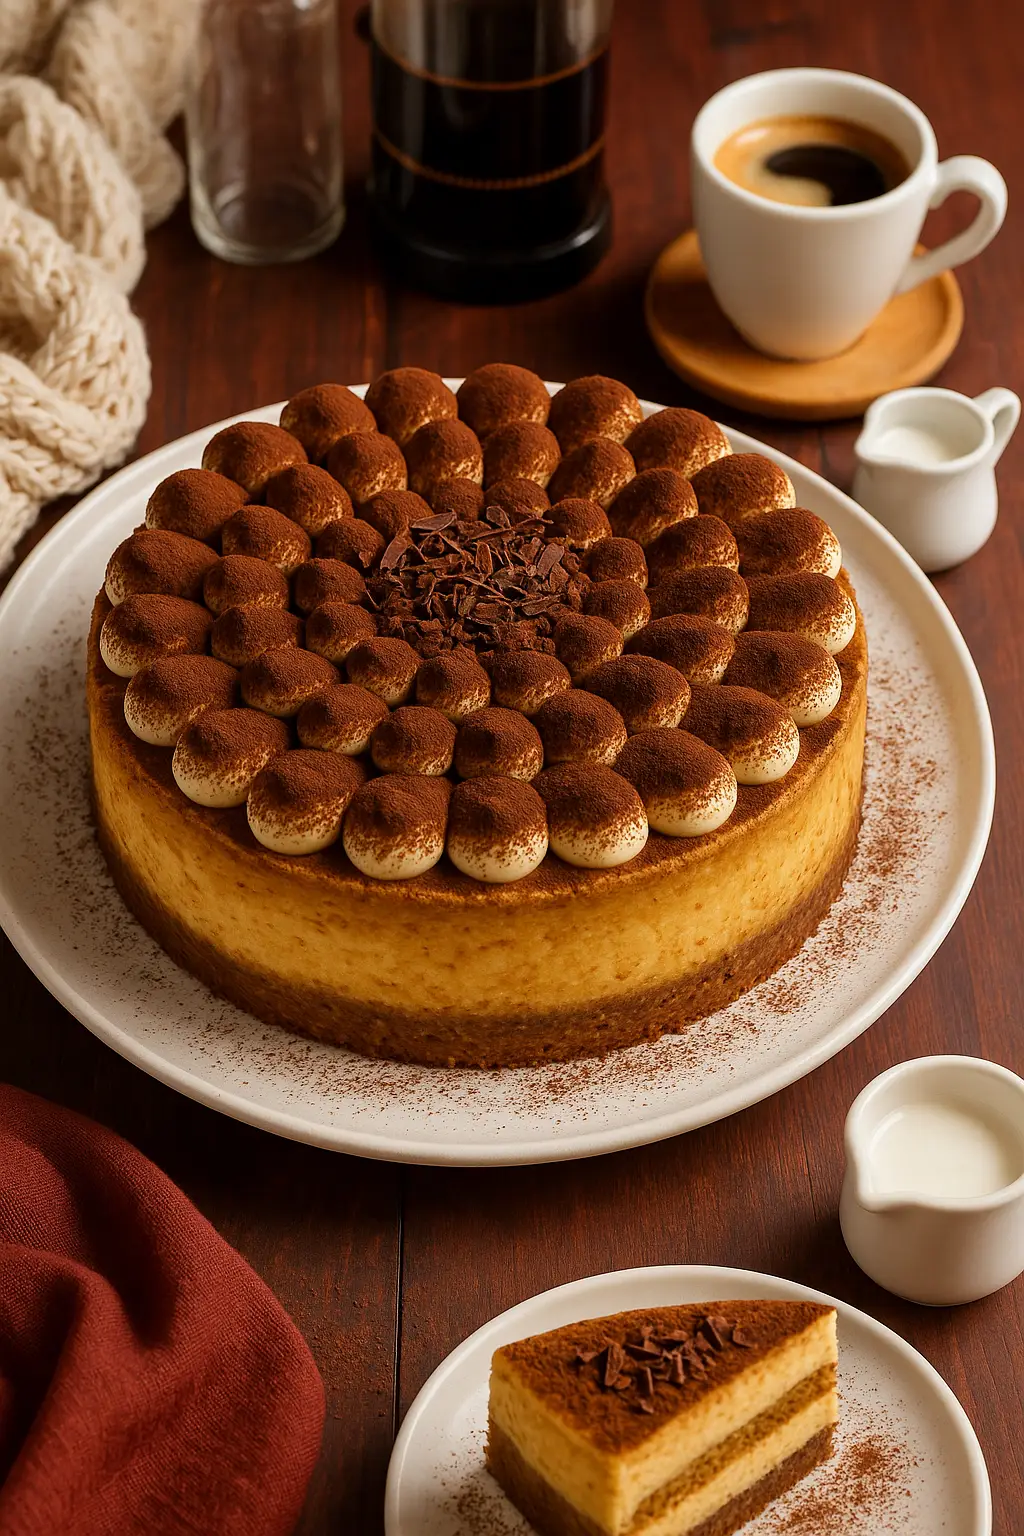
- Add the signature finish: Just before serving, generously dust the top with cocoa powder using a fine-mesh sieve for even distribution. If desired, add chocolate shavings and piped whipped cream rosettes around the edges for an extra touch of elegance.
Tips for Tiramisu Cheesecake Perfection
Achieving Authentic Tiramisu Flavor
- Coffee quality matters immensely: Use freshly brewed espresso or the strongest coffee possible – this isn’t the place for weak coffee. The intensity will mellow as it mingles with the other ingredients.
- Consider the liqueur: While optional, a splash of coffee liqueur adds remarkable depth. Traditional tiramisu often features Marsala wine, but Kahlúa, Tia Maria, or even Amaretto can contribute wonderful nuance.
Mastering Cheesecake Texture
- Temperature harmony: Every dairy ingredient must be at proper room temperature to achieve that silky-smooth consistency.
- The mixing sequence matters: Following the exact order of ingredients ensures proper emulsification and texture development.
- Water bath wisdom: Never skip this step! The gentle, moist heat prevents the dramatic temperature fluctuations that cause cracking and ensures even baking.
Perfect Ladyfingers
- The 2-second rule: Count “one-one thousand, two-one thousand” while dipping each ladyfinger. Any longer results in sodden cookies that won’t provide the right textural contrast.
- Reserve extra coffee mixture: Keep a little of your coffee soak aside. If your ladyfingers seem too dry after arranging, you can brush a little extra on top before adding the filling.
Elegant Variations
Chocolate Tiramisu Cheesecake
Add 4 ounces of melted and cooled bittersweet chocolate to your cheesecake batter, then pour half over the ladyfinger base. Arrange a second layer of coffee-soaked ladyfingers, then top with remaining batter for a multi-layered effect.
Mocha Swirl Edition
Before baking, drizzle 3 tablespoons of a mixture made from 2 tablespoons espresso and 1 tablespoon chocolate syrup over the cheesecake batter. Use a toothpick to create elegant swirls throughout the filling.
Amaretto Infusion
Replace the coffee liqueur with Amaretto in both the soaking liquid and cheesecake filling for a sophisticated almond flavor that complements the coffee notes beautifully.
Individual Tiramisu Cheesecakes
For an impressive dinner party presentation, divide all components among 8-10 glass serving dishes or ramekins. Reduce baking time to approximately 25-30 minutes in a water bath, or consider making them no-bake by folding 1 cup of whipped heavy cream into the filling mixture.
Storing Your Tiramisu Cheesecake
This Tiramisu Cheesecake reaches its flavor peak when served chilled but not ice-cold. Remove from the refrigerator about 20-30 minutes before serving to allow the nuanced flavors to fully express themselves.
Storage: Cover any leftovers loosely with foil or plastic wrap and refrigerate for up to 4 days, though the ladyfinger base will gradually soften over time.
Freezing: This cheesecake freezes beautifully for up to 2 months. After chilling completely, wrap the unmolded cheesecake (without the cocoa dusting) tightly in plastic wrap, then in aluminum foil. Thaw overnight in the refrigerator and add the cocoa dusting just before serving.
Ready To Bake ?!
There’s something truly magical about the way this Tiramisu Cheesecake bridges culinary traditions. It captures the essence of a lazy afternoon in a Venetian café while honoring the rich decadence of an American classic. Each forkful delivers the perfect balance – the unmistakable coffee notes, the luxurious creaminess, the subtle sweetness that never overwhelms.
Whether you’re serving it for a holiday gathering, a dinner party finale, or simply because some moments in life deserve extraordinary dessert, this creation promises to leave a lasting impression. Even those who claim to prefer tiramisu or cheesecake exclusively will find themselves converted to this harmonious union.
I’d love to see your Tiramisu Cheesecake creations! Share your photos in the comments section below and let me know if you tried any of the variations. Did you make it for a special occasion? How did your guests react? Every baker brings their own touch to a recipe, and I’m excited to hear how this masterpiece came to life in your kitchen.
FAQs About Tiramisu Cheesecake
Can I make this without alcohol?
Absolutely! Simply omit the coffee liqueur from both the soaking liquid and the filling. The dessert will still be delicious, though slightly less complex in flavor. Consider adding an extra teaspoon of vanilla extract to the filling for additional depth.
What if I can’t find ladyfingers?
While traditional ladyfingers (Savoiardi) deliver the most authentic result, you can substitute with:
- Pound cake slices, lightly toasted
- Sponge cake layers, cut to fit
- Graham cracker crust (though this creates a different texture experience)
Why did my cheesecake crack?
The most common culprits are:
- Overmixing the batter after adding eggs (incorporates too much air)
- Skipping the water bath (causes uneven baking)
- Cooling too quickly (creates temperature shock)
- Overbaking (always look for that slight wobble in the center)
Can I prepare components ahead of time?
Yes! You can:
- Brew and cool the coffee mixture a day ahead
- Prepare the springform pan with the ladyfinger base a few hours before making the filling
- Make the entire cheesecake 1-2 days before your event (it actually improves with a longer rest)
How do I achieve the perfect cocoa dusting?
Use a fine-mesh sieve held several inches above the cheesecake, and tap it gently for the most even distribution. Apply just before serving, as the cocoa can absorb moisture when refrigerated and lose its velvety appearance.