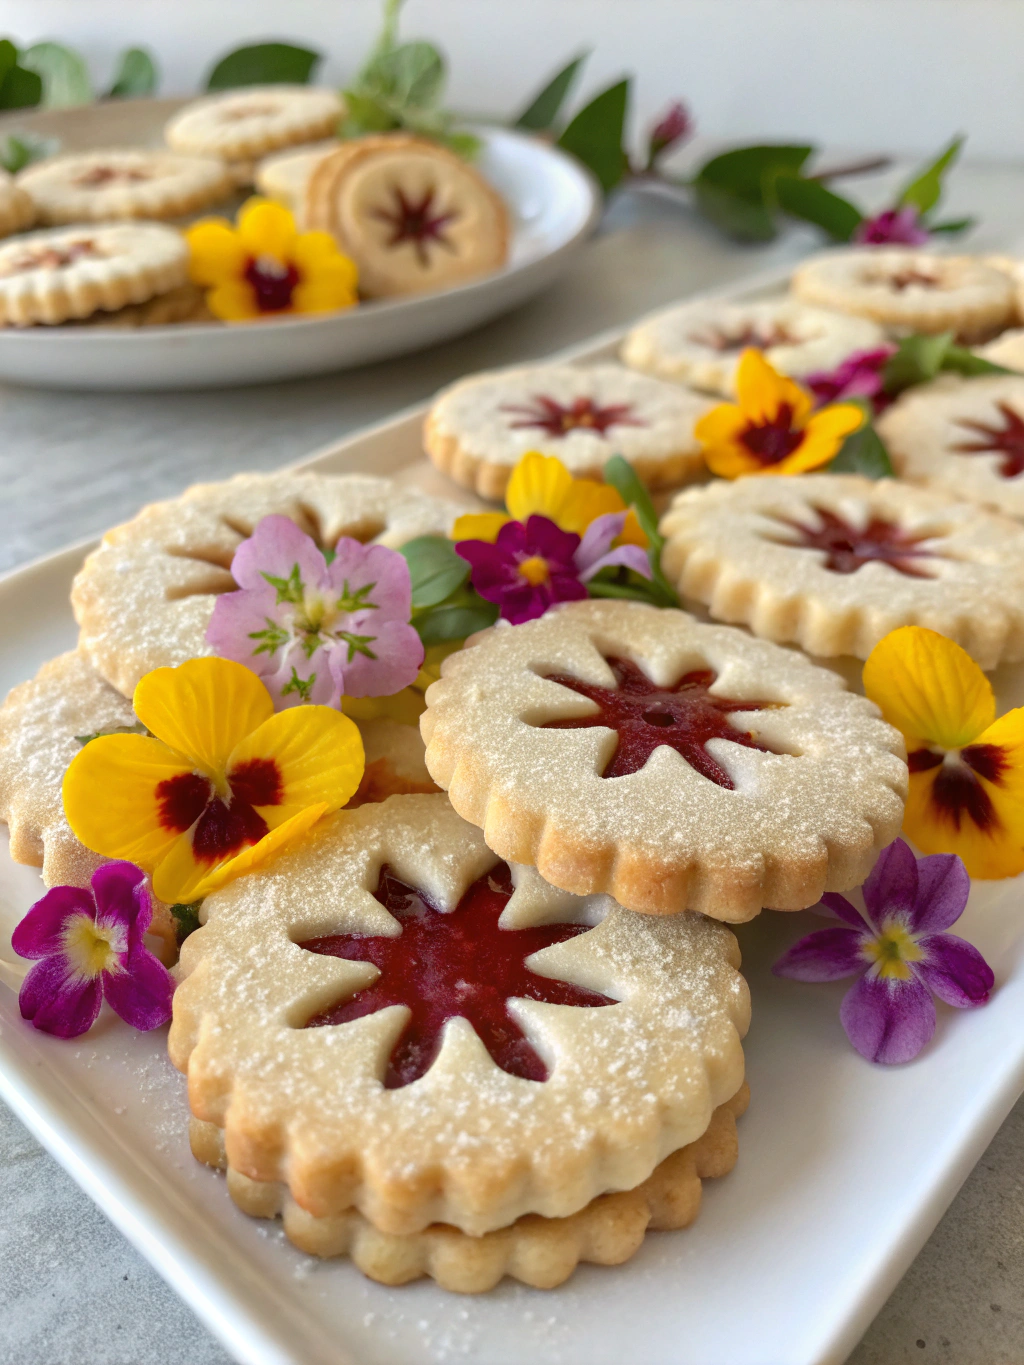
Spring Flower Linzer Cookies
Enter the Spring Flower Linzer Cookies: a delicate masterpiece that captures the very essence of spring on your plate. Imagine biting into a cookie so tender it practically dissolves on your tongue, its buttery, almond-kissed crumb giving way to a jewel-bright center of sweet-tart jam that sparkles like morning dew. The gentle dusting of confectioners’ sugar catches the light like the first frost of dawn, while the intricate flower cutout reveals the ruby or amber heart within—nature’s own stained glass window, edible and exquisite.
Spring Flower Linzer Cookies Recipe Overview
Baking Time and Nutrition Facts
24 cookies
30 Minutes
14 Minutes
2h30m
Spring Flower Linzer Cookies Ingredients
Key Ingredients
- For the Almond Cookie Dough:
225g (1 cup) unsalted butter, European-style preferred, at room temperature
100g (¾ cup + 2 tablespoons) confectioners’ sugar
1 large egg yolk (save the white for another use)
1½ teaspoons pure vanilla extract
Zest of 1 medium lemon, finely grated
200g (1⅔ cups) all-purpose flour
100g (1 cup) finely ground blanched almond flour (this is non-negotiable for authentic texture)
½ teaspoon fine sea salt
- For Assembly & Finishing:
240g (¾ cup) high-quality raspberry or apricot jam, seedless and thick consistency
Confectioners’ sugar for dusting
Chef’s Note: The quality of your jam makes an enormous difference. Choose a preserve with a thick consistency that won’t run when warmed, and ensure it’s seedless for the smoothest filling.
How To Make Spring Flower Linzer Cookies
Instructions
- Step 1: Creating the Perfect Almond Dough
- Begin by bringing your butter to the ideal room temperature—it should yield slightly to pressure but still hold its shape. In the bowl of your stand mixer fitted with the paddle attachment, cream the butter and confectioners’ sugar together on medium speed for 3-4 minutes until the mixture becomes pale and fluffy, almost cloud-like in appearance.
- Add the egg yolk, vanilla extract, and lemon zest, beating until just combined. The mixture may look slightly curdled at this point—this is completely normal and will resolve once we add the dry ingredients.
- In a separate bowl, whisk together the all-purpose flour, almond flour, and salt. With your mixer on the lowest speed, gradually add the flour mixture to the butter mixture, mixing just until the dough comes together. The moment you no longer see streaks of flour, stop mixing. Overworking at this stage will develop the gluten and create tough cookies instead of our desired tender crumb.
- Step 2: The All-Important Chill (Non-Negotiable!)
- Turn your dough out onto a lightly floured surface and gently gather it into a cohesive mass. Divide it in half and shape each portion into a flat disk about 1-inch thick. Wrap each disk tightly in plastic wrap and refrigerate for at least 1 hour, though 2 hours is even better.
- Why this matters: Chilling firms the butter, making the dough easier to roll without sticking. It also allows the flour to fully hydrate and the flavors to meld beautifully.
- Step 3: Rolling & Cutting with Precision
- Working with one disk at a time (keep the other chilled), roll the dough between two sheets of parchment paper to an even ⅛-inch (3mm) thickness. If the dough becomes too soft to work with, slip it back into the refrigerator for 15 minutes.
- Using your flower-shaped cutters, cut an equal number of solid flower shapes and windowed flower shapes (with the center cut out). You should get approximately 24 complete sandwich cookies. Place the cut cookies on parchment-lined baking sheets, spacing them 1 inch apart.
- Chef’s Secret: If your dough scraps become too warm during re-rolling, chill them again. Patient bakers make perfect cookies.
- Step 4: Baking to Pale Golden Perfection
- Preheat your oven to 325°F (165°C). This moderate temperature ensures even baking without over-browning.
- Bake the cookies for 12-14 minutes, rotating the pans halfway through for even coloring. The cookies are done when the edges are just barely beginning to turn golden—they should still appear quite pale. They’ll continue to firm up as they cool.
- Allow the cookies to cool completely on the baking sheets for 5 minutes before transferring to wire racks.
- Step 5: The Artful Assembly (The Patissier’s Trick)
- Here’s where the magic happens. Before filling, dust all of your windowed cookie tops with confectioners’ sugar using a fine-mesh sieve. This step is crucial—it prevents the jam from making the cookies sticky and creates that beautiful, professional contrast.
- Warm your jam slightly in the microwave (15-20 seconds) to make it spreadable but not hot. Using a small offset spatula or the back of a teaspoon, spread a thin, even layer of jam on each solid cookie bottom, leaving a small border around the edge.
- Gently press the sugar-dusted tops onto the jam-covered bottoms, creating perfect little sandwiches with jewel-bright centers peeking through.
Secrets to Flawless Linzer Cookies
The Magic of Almond Flour
The inclusion of finely ground almond flour isn’t just for flavor—it’s a textural game-changer. Almond flour contains natural fats and no gluten, which inhibits gluten development in the all-purpose flour. This creates that signature melt-in-your-mouth quality that makes Linzer cookies so extraordinary.
Temperature is Your Best Friend
Every stage of this recipe hinges on proper temperature control. Cold butter in warm dough leads to spreading. Warm jam on warm cookies creates a mess. Patience with temperature will reward you with professional-looking results.
The “Dust First” Rule
Always, always dust your windowed tops with confectioners’ sugar before assembly. This professional technique prevents jam from sticking to the surface and creates a beautiful, snow-dusted appearance that makes these cookies absolutely irresistible.
Perfect Jam Selection
Choose jams that are thick enough to stay put but not so thick they tear the delicate cookies. Raspberry and apricot are classic choices, but don’t be afraid to experiment with fig preserves or even a high-quality orange marmalade for special occasions.
Storing Your Spring Flower Linzer Cookies
Present these beauties on a white porcelain platter or vintage cake stand—their flower shapes will look like a garden in bloom. They’re perfect alongside a pot of Earl Grey tea or champagne at a spring celebration.
Store your finished cookies in an airtight container at room temperature for up to 5 days. In fact, they become even more delicious on day two, as the jam softly perfumes the cookie and the flavors meld together beautifully.
Make-Ahead Tips: The dough can be made up to 3 days in advance and kept refrigerated, or frozen for up to 3 months. Baked (but unfilled) cookies can be stored for up to 1 week before assembly.
Your Spring Baking Triumph Awaits
Congratulations, dear baker! You’ve just mastered one of the most elegant and rewarding cookies in the patissier’s repertoire. These Spring Flower Linzer Cookies are more than a sweet treat—they’re an expression of the season’s joy, a celebration of the baker’s craft, and a gift of love to everyone fortunate enough to taste them.
As you arrange these delicate beauties on your serving plate, take a moment to appreciate what you’ve accomplished. You’ve transformed simple ingredients into something magical, creating cookies that would be at home in the finest European bakery. The tender, buttery crumb that dissolves on the tongue, the bright jewel of jam at the center, the delicate dusting of sugar like morning frost—every element works in perfect harmony.
Whether you’re welcoming spring with an Easter gathering, celebrating the mothers in your life, or simply bringing beauty into an ordinary day, these cookies carry with them the promise of warmer days, blooming gardens, and the infinite joy found in creating something beautiful with your own hands.