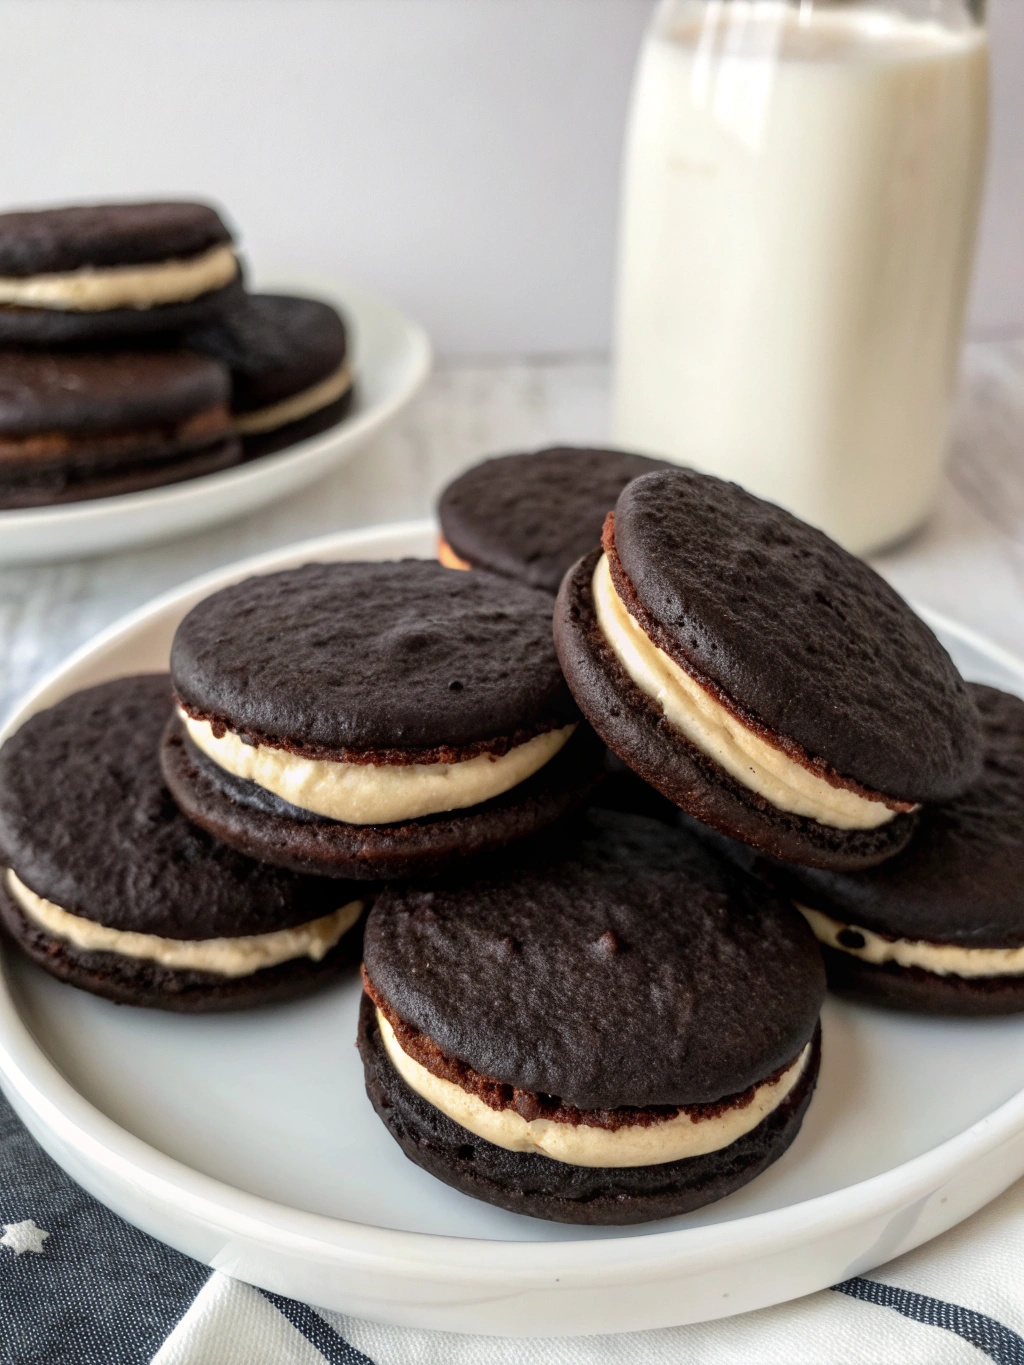
Black Velvet Sandwich Cookies Recipe
These aren’t just cookies; they’re edible art. These Black Velvet Sandwich Cookies are what happens when you take the beloved concept of an Oreo and elevate it to pastry chef standards. The secret lies in one magical ingredient: black cocoa powder, which creates that stunning, inky darkness while delivering a flavor profile that’s sophisticated, smooth, and utterly irresistible.
I know what you might be thinking—working with specialty ingredients sounds intimidating. But here’s the beautiful truth: this recipe is surprisingly straightforward. With just a few simple techniques and that one special ingredient, you’ll create sandwich cookies that look like they came from the most exclusive bakery in Paris. These are guaranteed showstoppers that will have your guests asking for the recipe and wondering how you achieved such professional-looking results.
Black Velvet Sandwich Cookies Recipe Overview
Baking Time and Nutrition Facts
20 Cookies
20 minutes
12 minutes
1h20minutes
Black Cocoa Powder Makes These Cookies Special
Before we dive into the recipe, let’s talk about the star ingredient that makes these cookies so extraordinary: black cocoa powder.
What is Black Cocoa Powder?
Black cocoa powder is an ultra-Dutch-processed cocoa powder that has been treated with an alkalizing agent to an extreme degree. This process not only neutralizes the natural acidity in cocoa but also dramatically darkens the color, creating that signature deep-black hue that regular cocoa powder simply cannot achieve.
How Does It Differ from Regular Cocoa?
- Regular Cocoa Powder: Acidic, lighter brown color, more pronounced chocolate flavor with some bitterness
- Dutch-Process Cocoa: Alkalized to reduce acidity, darker brown color, milder flavor
- Black Cocoa Powder: Ultra-alkalized, deep black color, smooth flavor with virtually no bitterness
Where to Buy Black Cocoa Powder
You can find black cocoa powder online through specialty baking suppliers like King Arthur Baking, Williams Sonoma, or Amazon. Some well-stocked grocery stores carry it in their baking aisles, particularly those with extensive specialty ingredient sections.
Important Note: Black cocoa powder cannot be substituted with regular or Dutch-process cocoa powder if you want to achieve the dramatic black color and smooth flavor profile that makes these cookies special.
Black Velvet Sandwich Cookies Ingredients
Key Ingredients
- For the Black Velvet Cookies:
240g (2 cups) all-purpose flour
75g (¾ cup) black cocoa powder
1 teaspoon baking soda
1 teaspoon fine salt
226g (1 cup) unsalted butter, room temperature
200g (1 cup) granulated sugar
1 large egg, room temperature
2 teaspoons pure vanilla extract
- For the Cream Cheese Filling:
113g (4 oz) full-fat cream cheese, room temperature (block style, not spreadable)
57g (4 tablespoons) unsalted butter, room temperature
240g (2 cups) powdered sugar, sifted
Pinch of fine salt
1 teaspoon pure vanilla extract
How To Make Black Velvet Sandwich Cookies
Part 1: Creating the Black Velvet Cookie Dough
Instructions
- Prep Your Workspace
Preheat your oven to 350°F (175°C). Line two large baking sheets with parchment paper and set aside. - Combine the Dry Ingredients
In a medium bowl, whisk together the flour, black cocoa powder, baking soda, and salt. Set this mixture aside. The black cocoa will make your dry ingredient mixture look dramatically dark—this is exactly what we want! - Cream the Butter and Sugar
In the bowl of your stand mixer (or large bowl if using a hand mixer), cream the room-temperature butter and granulated sugar together using the paddle attachment on medium speed for 3-4 minutes. The mixture should become light, fluffy, and noticeably paler in color.
Pro Tip: Room-temperature butter is crucial here. It should give slightly when pressed but not be so soft that it’s greasy. If you forgot to take it out ahead of time, cut it into small cubes to speed up the softening process. - Add Egg and Vanilla
Add the egg and vanilla extract to the creamed butter mixture. Beat on medium speed until fully incorporated, about 1 minute. Scrape down the sides of the bowl as needed. - Incorporate the Dry Ingredients
With the mixer on low speed, gradually add the flour mixture to the wet ingredients. Mix just until the dough comes together—overmixing will result in tough cookies. The dough will transform into a dramatically dark, almost black color that’s truly stunning. - The Crucial Chill
Wrap the dough tightly in plastic wrap and refrigerate for at least 1 hour, or up to overnight. Do not skip this step! Chilling solidifies the fat, which prevents the cookies from spreading into thin wafers and helps maintain their shape during baking.
Part 2: Baking Perfect Black Velvet Cookies
Instructions
- Shape the Cookies
Using your cookie scoop, portion the chilled dough into uniform balls and place them on your prepared baking sheets, spacing them about 2 inches apart. Gently flatten each ball slightly with your fingers or the bottom of a glass—they should be about ½ inch thick.
Why Uniformity Matters: Using a cookie scoop ensures all your cookies are the same size, which means they’ll bake evenly and you’ll have perfectly matched pairs for assembly. - Bake to Perfection
Bake for 10-12 minutes. Since the cookies are so dark, you’ll need to rely on other cues for doneness: they should be set around the edges and spring back lightly when touched in the center. They may look slightly underbaked—this is perfect, as they’ll continue cooking on the hot pan. - Cool Completely
Allow the cookies to cool on the baking sheet for 5 minutes before transferring to a wire rack. This initial cooling period prevents them from breaking. Cool completely before filling—warm cookies will melt your beautiful cream cheese filling!
Part 3: Whipping the Perfect Cream Cheese Filling
Instructions
- Prepare Your Dairy
Ensure both your cream cheese and butter are at room temperature. This is non-negotiable for a smooth, lump-free filling. - Create the Base
In a clean mixer bowl, beat the cream cheese and butter together on medium speed until completely smooth and fluffy, about 3-4 minutes. Stop the mixer and scrape down the sides several times during this process. - Add the Sweet Elements
With the mixer on low speed, gradually add the sifted powdered sugar, salt, and vanilla extract. Once incorporated, increase to medium-high speed and beat for 2-3 minutes until the filling is light, fluffy, and perfectly white.
Pro Tip: Adding the powdered sugar gradually while the mixer is on low speed prevents the dreaded sugar cloud explosion in your kitchen!
Part 4: The Art of Assembly
Instructions
- Match Your Pairs
Sort your cooled cookies into pairs of similar sizes. This attention to detail will make your finished cookies look professionally made. - Fill Like a Pro
Transfer your cream cheese filling to a piping bag fitted with a large round tip. Pipe about 1 tablespoon of filling onto the flat side of one cookie, leaving a small border around the edges. Alternatively, you can spread the filling with an offset spatula for a more rustic look. - Complete the Sandwiches
Gently press the second cookie on top, flat side down, until the filling just reaches the edges. Don’t press too hard—you want a generous layer of that beautiful white filling visible from the sides.
Pastry Chef’s Keys to Success
The Magic of Black Cocoa
Black cocoa powder is the heart of this recipe. Its ultra-Dutch processing creates that stunning inky color while delivering a smooth, sophisticated chocolate flavor without any harsh bitterness. Regular cocoa powder simply cannot achieve these results—the color will be brown instead of black, and the flavor will be more acidic and bitter.
Don’t Skip the Chill
Chilling the dough is absolutely crucial. It solidifies the fat, which prevents excessive spreading during baking. Unchilled dough will result in thin, crispy wafers instead of the tender, substantial cookies we’re after. The cold dough also holds its shape better and develops a more concentrated flavor.
Uniformity is Everything
Using a cookie scoop isn’t just convenient—it’s essential for professional results. Uniform cookies bake evenly and create perfect sandwich pairs. If you don’t have a cookie scoop, use a kitchen scale to portion 20-25g pieces of dough.
Room Temperature is Your Friend
Room-temperature butter and cream cheese are non-negotiable. Cold dairy won’t cream properly and will result in lumpy dough and filling. Plan ahead and take these ingredients out of the refrigerator 1-2 hours before baking.
Why Are My Cookies Spreading?
If your cookies spread too much during baking, the most common culprits are:
- Insufficient chilling time
- Butter that was too warm when mixing
- Oven temperature that’s too low
- Old baking soda that’s lost its potency
Storing Your Black Velvet Sandwich Cookies
The Perfect Rest
Your assembled cookies will be delicious immediately, but they’re even better after resting in the refrigerator for at least 1 hour. This allows the filling to set properly and the cookies to soften slightly, creating the perfect texture balance.
Storage Instructions
Store your Black Velvet Sandwich Cookies in an airtight container in the refrigerator for up to 1 week. Layer them between sheets of parchment paper to prevent sticking. Bring to room temperature for 15-20 minutes before serving for the best texture and flavor.
Creative Variations
Once you’ve mastered the basic recipe, try these exciting variations:
- Peppermint Black Velvet: Add ½ teaspoon peppermint extract to the filling
- Orange Cream: Add 1 teaspoon orange zest to the filling
- Festive Edges: Roll the assembled cookies in colorful sprinkles, mini chocolate chips, or chopped nuts
- Salted Caramel: Drizzle assembled cookies with salted caramel sauce
Troubleshooting Common Issues
How to Fill Sandwich Cookies Neatly
The key to neat filling is consistency and the right tool. A piping bag gives you the most control, but if you don’t have one, use a small offset spatula or even a butter knife. Apply steady, even pressure and aim for about 1 tablespoon of filling per cookie.
My Filling is Too Soft
If your filling is too soft to hold its shape, it’s likely that your butter or cream cheese wasn’t at the proper room temperature, or your kitchen is very warm. Refrigerate the filling for 15-20 minutes to firm it up before using.
My Cookies Are Too Hard
Overbaking is usually the culprit. Remember, these dark cookies can be tricky to judge visually. Set a timer and rely on the touch test—they should spring back lightly when gently pressed in the center.
The Sweet Victory
Congratulations! You’ve just created something truly extraordinary—sandwich cookies that rival the most expensive bakery treats while surpassing them in flavor, freshness, and that undeniable pride that comes from making something beautiful with your own hands.
The dramatic visual impact of these Black Velvet Sandwich Cookies never fails to impress, but it’s the incredible flavor combination that keeps people coming back for more. That deep, sophisticated chocolate paired with the bright, tangy cream cheese filling creates a perfect balance that’s both nostalgic and elegantly refined.
Have you tried this recipe? I’d love to hear about your Black Velvet Sandwich Cookie adventures! Share your photos and any creative variations you discovered in the comments below.